| Wyndon Stadium
|
シュートスタジアム
Shoot Stadium
|
| "Wild Missingno. appeared!"
|
|
|
|

Wyndon Stadium in {{{variable2}}}.
|
|
Map description
| This area is not described by a map.
|
|
|
[[|Wyndon Stadium Gym]] - Galar Gym #{{{gymno}}}
[[File:{{{leadersprite}}}|{{{leader}}}|link={{{leader}}}]]
[[{{{leader}}}|{{{leader}}}]]
|
No specialty type
|
[[File:{{{badge}}} Badge.png|70px|{{{badge}}} Badge|link=Badge#{{{badge}}} Badge]]
[[Badge#{{{badge}}} Badge|{{{badge}}} Badge]]
|
|
[[|Wyndon Stadium Gym]] - Galar Gym #{{{gymno}}}
[[File:{{{leadersprite2}}}|{{{leader2}}}|link={{{leader2}}}]]
[[{{{leader2}}}|{{{leader2}}}]]
|
Unknown-type
specialist Gym
|
[[File:{{{badge}}} Badge.png|70px|{{{badge}}} Badge|link=Badge#{{{badge}}} Badge]]
[[Badge#{{{badge}}} Badge|{{{badge}}} Badge]]
|
|
[[|Wyndon Stadium Gym]] - Galar Gym #{{{gymno}}}
[[File:{{{leadersprite3}}}|{{{leader3}}}|link={{{leader3}}}]]
[[{{{leader3}}}|{{{leader3}}}]]
|
Unknown-type
specialist Gym
|
[[File:{{{badge}}} Badge.png|70px|{{{badge}}} Badge|link=Badge#{{{badge}}} Badge]]
[[Badge#{{{badge}}} Badge|{{{badge}}} Badge]]
|
|
[[| League]]
[[File:{{{elite1sprite}}}|64px|{{{elite1}}}|link={{{elite1}}}]]
Elite Four
[[{{{elite1}}}|{{{elite1}}}]]
|
[[File:{{{elite2sprite}}}|64px|{{{elite2}}}|link={{{elite2}}}]]
Elite Four
[[{{{elite2}}}|{{{elite2}}}]]
|
[[File:{{{elite3sprite}}}|64px|{{{elite3}}}|link={{{elite3}}}]]
Elite Four
[[{{{elite3}}}|{{{elite3}}}]]
|
[[File:{{{elite4sprite}}}|64px|{{{elite4}}}|link={{{elite4}}}]]
Elite Four
[[{{{elite4}}}|{{{elite4}}}]]
|
[[File:{{{championsprite}}}|{{{champion}}}|link={{{champion}}}]]
Champion [[{{{champion}}}|{{{champion}}}]]
|
|
[[| League]]
[[File:{{{elite1sprite2}}}|64px|{{{elite12}}}|link={{{elite12}}}]]
Elite Four
[[{{{elite12}}}|{{{elite12}}}]]
|
[[File:{{{elite2sprite2}}}|64px|{{{elite22}}}|link={{{elite22}}}]]
Elite Four
[[{{{elite22}}}|{{{elite22}}}]]
|
[[File:{{{elite3sprite2}}}|64px|{{{elite32}}}|link={{{elite32}}}]]
Elite Four
[[{{{elite32}}}|{{{elite32}}}]]
|
[[File:{{{elite4sprite2}}}|64px|{{{elite42}}}|link={{{elite42}}}]]
Elite Four
[[{{{elite42}}}|{{{elite42}}}]]
|
[[File:{{{championsprite2}}}|{{{champion2}}}|link={{{champion2}}}]]
Champion [[{{{champion2}}}|{{{champion2}}}]]
|
|
|
|
Location
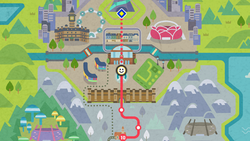
Location of Wyndon Stadium in Galar.
|
Wyndon Stadium (Japanese: シュートスタジアム Shoot Stadium) is the official Stadium of Wyndon. It serves as the venue for the Galar League's Champion Cup.
Items
Ball Guy's rewards
Each time the player wins a Champion Cup tournament during the post-game, the Ball Guy will give them one of the following rewards.
Trainers
Wyndon Stadium is the largest stadium in Galar and the site of the Champion Cup. Rather than facing an Elite Four like in other regions, the Champion Cup is a single-elimination tournament that determines who is eligible to challenge the Champion.
First challenge
Semifinals
Round 1: Marnie
Marnie will Gigantamax her Grimmsnarl at the first opportunity.

|
|
Reward: $7,840
|
|
|
|
|
|
Round 2: Hop
 If the player chose Grookey:

|
|
Reward: $5,880
|
|
|
|
|
|
 If the player chose Scorbunny:
|
|
|
Reward: $5,880
|
|
|
|
|
|
 If the player chose Sobble:
|
|
|
Reward: $5,880
|
|
|
|
|
|
Finals
Bede

|
|
Reward: $8,480
|
|
|
|
|
|
Round 1: Nessa

|
|
Reward: $8,480
|
|
|
|
|
|
Round 2: BeaSw/AllisterSh

|
|
Reward: $8,640
|
|
|
|
|
|

|
|
Reward: $8,640
|
|
|
|
|
|
Round 3: Raihan

|
|
Reward: $8,800
|
|
|
|
|
|
Championship Match
If the player chose Grookey:

|
|
Reward: $15,600
|
|
|
|
|
|
If the player chose Scorbunny:
|
|
|
Reward: $15,600
|
|
|
|
|
|
If the player chose Sobble:
|
|
|
Reward: $15,600
|
|
|
|
|
|
Champion tournaments
After becoming the Champion, the player may repeatedly participate in the Champion Cup. In order to maintain the Champion title, the player must win three rounds in a single-elimination tournament.
Special Trainers
These Trainers may appear in the tournament after receiving their rare League Cards, either randomly or by the player's invitation. With the exception of Piers, they all have a Pokémon that they will Gigantamax at the first opportunity. They are listed in the order they are presented when asked for an invite by the League staff attendant.
Leon
If the player chose Grookey:
|
|
|
Reward: $16,800
|
|
|
|
|
|
If the player chose Scorbunny:
|
|
|
Reward: $16,800
|
|
|
|
|
|
If the player chose Sobble:
|
|
|
Reward: $16,800
|
|
|
|
|
|
Hop
Pokémon Sword
If the player chose Grookey:
|
|
|
Reward: $16,800
|
|
|
|
|
|
If the player chose Scorbunny:
|
|
|
Reward: $16,800
|
|
|
|
|
|
If the player chose Sobble:
|
|
|
Reward: $16,800
|
|
|
|
|
|
Pokémon Shield
If the player chose Grookey:
|
|
|
Reward: $16,800
|
|
|
|
|
|
If the player chose Scorbunny:
|
|
|
Reward: $16,800
|
|
|
|
|
|
If the player chose Sobble:
|
|
|
Reward: $16,800
|
|
|
|
|
|
Bede
|
|
|
Reward: $10,080
|
|
|
|
|
|
Milo
Pokémon Sword

|
|
Reward: $9,920
|
|
|
|
|
|
Pokémon Shield
|
|
|
Reward: $9,920
|
|
|
|
|
|
Nessa
|
|
|
Reward: $9,920
|
|
|
|
|
|
Kabu

|
|
Reward: $9,920
|
|
|
|
|
|
|
|
|
Reward: $9,920
|
|
|
|
|
|
AllisterSh
|
|
|
Reward: $9,920
|
|
|
|
|
|
GordieSw

|
|
Reward: $9,920
|
|
|
|
|
|
MelonySh

|
|
Reward: $9,920
|
|
|
|
|
|
Piers

|
|
Reward: $9,920
|
|
|
|
|
|
Raihan
|
|
|
Reward: $9,920
|
|
|
|
|
|
Marnie

|
|
Reward: $9,600
|
|
|
|
|
|
Gym Challengers
The following Gym Challengers may also appear during a Champion tournament. Their Pokémon are typically at a lower level than the above Trainers', and these Trainers do not use Dynamax.
Yue

|
|
Reward: $8,120
|
|
|
|
|
|
Polaire

|
|
Reward: $8,120
|
|
|
|
|
|
Kent

|
|
Reward: $8,120
|
|
|
|
|
|
Vega

|
|
Reward: $8,120
|
|
|
|
|
|
Cher

|
|
Reward: $8,120
|
|
|
|
|
|
Deneb

|
|
Reward: $8,120
|
|
|
|
|
|
Icla

|
|
Reward: $8,120
|
|
|
|
|
|
Wei

|
|
Reward: $8,120
|
|
|
|
|
|
Izar

|
|
Reward: $8,120
|
|
|
|
|
|
Dunne

|
|
Reward: $8,120
|
|
|
|
|
|
Pia

|
|
Reward: $8,120
|
|
|
|
|
|
Corvin

|
|
Reward: $8,120
|
|
|
|
|
|
Terry

|
|
Reward: $8,120
|
|
|
|
|
|
Theemin

|
|
Reward: $8,120
|
|
|
|
|
|
Phoebus


