Heal Ball: Difference between revisions
mNo edit summary |
Thespeon196 (talk | contribs) m (→In animation) |
||
| (52 intermediate revisions by 23 users not shown) | |||
| Line 10: | Line 10: | ||
{{ItemInfobox/BagRow|VI|Items|colorscheme=Poké Balls}} | {{ItemInfobox/BagRow|VI|Items|colorscheme=Poké Balls}} | ||
{{ItemInfobox/BagRow|VII|Items|colorscheme=Poké Balls}} | {{ItemInfobox/BagRow|VII|Items|colorscheme=Poké Balls}} | ||
{{ItemInfobox/BagRowBottom| | {{ItemInfobox/BagRow|VIII|Poké Balls}} | ||
{{ItemInfobox/BagRowBottom|IX|Poké Balls}} | |||
|} | |} | ||
| Line 17: | Line 18: | ||
==In the core series games== | ==In the core series games== | ||
===Price=== | ===Price=== | ||
{{ItemPrice/ | {{ItemPrice/head|Poké Balls}} | ||
{{ItemPrice|{{gameabbrev4|DPPtHGSS}}<br>{{gameabbrev5|BWB2W2}}<br>{{gameabbrev6|XYORAS}}<br>{{gameabbrev7|SMUSUM}}<br>{{gameabbrev8|SwSh}} | {{ItemPrice|{{gameabbrev4|DPPtHGSS}}<br>{{gameabbrev5|BWB2W2}}<br>{{gameabbrev6|XYORAS}}<br>{{gameabbrev7|SMUSUM}}<br>{{gameabbrev8|SwSh}}{{gameabbrev8|BDSP}} | ||
|{{PDollar}}300|{{PDollar}}150}} | |{{PDollar}}300|{{PDollar}}150}} | ||
{{ItemPrice|{{gameabbrev9|SV}} | |||
|{{PDollar}}300|{{PDollar}}75}} | |||
|} | |} | ||
|} | |} | ||
| Line 25: | Line 28: | ||
===Effect=== | ===Effect=== | ||
====Manual activation==== | ====Manual activation==== | ||
When used from the [[Bag]] in a {{pkmn2|wild}} encounter, it attempts to catch the wild Pokémon with a [[catch rate]] modifier of 1× | When used from the [[Bag]] in a {{pkmn2|wild}} encounter, it attempts to catch the wild Pokémon with a [[catch rate]] modifier of 1×. | ||
If used on an [[Ultra Beast]], the catch rate modifier is instead always set to 0.1×. | If caught, the Pokémon's [[HP]], [[PP]], and [[status condition|status]] are fully restored. From [[Generation]] {{gen|IV}} to {{gen|VII}}, since Pokémon sent to the [[Pokémon Storage System]] are fully healed, this healing is only applicable if the caught Pokémon is placed in the party (in games in which Pokémon sent to the Pokémon Storage System are not healed, it is applicable regardless). | ||
If used on an [[Ultra Beast]], the catch rate modifier is instead always set to 410/4096× (~0.1×). | |||
====Held item==== | ====Held item==== | ||
| Line 35: | Line 40: | ||
{{movedesc|Poké Balls}} | {{movedesc|Poké Balls}} | ||
{{movedescentry|{{gameabbrev4|DPPtHGSS}}<br>{{gameabbrev5|BWB2W2}}|A remedial Poké Ball that restores the caught Pokémon's HP and eliminates any status problem.}} | {{movedescentry|{{gameabbrev4|DPPtHGSS}}<br>{{gameabbrev5|BWB2W2}}|A remedial Poké Ball that restores the caught Pokémon's HP and eliminates any status problem.}} | ||
{{movedescentry|{{gameabbrev6|XYORAS}}<br>{{gameabbrev7|SMUSUMPE}}<br>{{gameabbrev8| | {{movedescentry|{{gameabbrev6|XYORAS}}<br>{{gameabbrev7|SMUSUMPE}}<br>{{gameabbrev8|SwShBDSPLA}}|A remedial Poké Ball that restores the HP of a Pokémon caught with it and eliminates any status conditions.}} | ||
{{movedescentry|{{gameabbrev9|SV}}|A remedial Poké Ball that restores HP and eliminates status conditions for a Pokémon caught with it.}} | |||
|} | |} | ||
|} | |} | ||
===Acquisition=== | ===Acquisition=== | ||
{{ItemAvailability/ | {{ItemAvailability/head|Poké Balls}} | ||
|- | |- | ||
| {{gameabbrev4|DPPt}} | | {{gameabbrev4|DPPt}} | ||
| Line 62: | Line 68: | ||
| {{ci|Virbank}}, {{ci|Castelia}}, {{to|Lentimas}}, and {{OBP|Victory Road|Black 2 and White 2}} [[Poké Mart]]s, [[Shopping Mall Nine]] | | {{ci|Virbank}}, {{ci|Castelia}}, {{to|Lentimas}}, and {{OBP|Victory Road|Black 2 and White 2}} [[Poké Mart]]s, [[Shopping Mall Nine]] | ||
|- | |- | ||
| {{gameabbrevss|DW}} | | {{gameabbrevss|DW}}{{tt|*|No longer in service}} | ||
| | | | ||
| {{dwa|Pleasant Forest}} | | {{dwa|Pleasant Forest}} | ||
|- | |- | ||
| {{gameabbrev6|XY}} | | {{gameabbrev6|XY}} | ||
| {{rt|7|Kalos}}, [[Dendemille Town]] | | {{rt|7|Kalos}}, [[Dendemille Town]] | ||
| {{ci|Lumiose}} (North Boulevard and Centrico | | {{ci|Lumiose}} ([[North Boulevard]] and Centrico Plaza) and {{ci|Snowbelle}} [[Poké Mart]]s, {{DL|Autumnal Avenue|Poké Ball Boutique}} | ||
|- | |- | ||
| {{gameabbrev6|ORAS}} | | {{gameabbrev6|ORAS}} | ||
| | | | ||
| [[Verdanturf Town]] [[Poké Mart]]<br/>{{rt|103|Hoenn}} (20% chance after a rematch with {{tc|Poké Fan}} Miguel), {{rt|110|Hoenn}} (20% chance after a rematch with {{tc|Poké Fan}} Isabel) | | [[Verdanturf Town]] [[Poké Mart]]<br/>{{rt|103|Hoenn}} (20% chance after a [[rematch]] with {{tc|Poké Fan}} Miguel), {{rt|110|Hoenn}} (20% chance after a [[rematch]] with {{tc|Poké Fan}} Isabel) | ||
|- | |- | ||
| {{gameabbrevss|PMC}} | | {{gameabbrevss|PMC}}{{tt|*|No longer in service}} | ||
| | | | ||
| {{DL|PokéMileage Club|Mine Cart Adventure}} (all levels) | | {{DL|PokéMileage Club|Mine Cart Adventure}} (all levels) | ||
| Line 81: | Line 87: | ||
| [[Route]]s {{rtn|2|Alola}} and {{rtn|3|Alola}}, [[Hau'oli City]], [[Seaward Cave]], [[Paniola Ranch]], [[Aether Paradise]]{{sup/7|USUM}} | | [[Route]]s {{rtn|2|Alola}} and {{rtn|3|Alola}}, [[Hau'oli City]], [[Seaward Cave]], [[Paniola Ranch]], [[Aether Paradise]]{{sup/7|USUM}} | ||
| {{rt|2|Alola}} [[Poké Mart]], {{DL|Royal Avenue|Thrifty Megamart}}<br>[[Festival Plaza]] ([[Festival Plaza#Goody shops|Ball Shop]]){{sup/7|MUM}}<br/>{{rt|1|Alola}} (sometimes received from {{al|Mom}} after healing at home){{sup/7|USUM}} | | {{rt|2|Alola}} [[Poké Mart]], {{DL|Royal Avenue|Thrifty Megamart}}<br>[[Festival Plaza]] ([[Festival Plaza#Goody shops|Ball Shop]]){{sup/7|MUM}}<br/>{{rt|1|Alola}} (sometimes received from {{al|Mom}} after healing at home){{sup/7|USUM}} | ||
|- | |||
| {{gameabbrev8|SwSh}} | |||
| [[Route]]s {{rtn|3|Galar}} and {{rtn|5|Galar}} | |||
| Central [[Motostoke]] [[Poké Mart]]<br>All [[Wild Area]] [[Watt Trader]]s (20 {{Watt}})<br>[[Poké Job]] reward (Tiers I-IV)<br/>Reward from Ball Guy for clearing [[Champion Cup]] tournament during post-game (×3, 5% chance) | |||
|- | |||
| {{gameabbrev8|SwSh}}{{gameabbrev8|IA}} | |||
| | |||
| Hidden [[recurring item]] ([[Fields of Honor]], [[Brawlers' Cave]], [[Courageous Cavern]], [[Warm-Up Tunnel]])<br>[[Cram-o-matic]] ([[Pink Apricorn]]) | |||
|- | |||
| {{gameabbrev8|SwSh}}{{gameabbrev8|CT}} | |||
| | |||
| [[Snowslide Slope]] [[Watt Trader]] (20 {{Watt}})<br>Hidden [[recurring item]] ([[Slippery Slope]], [[Giant's Bed]], [[Ballimere Lake]])<br/>Reward from Ball Guy for clearing [[Galarian Star Tournament]] during post-game (×3, 5% chance) | |||
|- | |||
| {{gameabbrev8|BDSP}} | |||
| [[Oreburgh City]] | |||
| {{ci|Jubilife}}, {{ci|Oreburgh}}, {{to|Floaroma}}, {{ci|Eterna}}, {{ci|Hearthome}}, and {{si|Pokémon League}} [[Poké Mart]]s<br/>[[Pokémon News Press]] | |||
|- | |||
| {{gameabbrev9|SV}} | |||
| [[Area Zero]], [[East Province (Area One)]], [[North Province (Area One)]], [[South Province (Area Two)]], [[South Province (Area Four)]], [[South Province (Area Five)]]<br>[[Naranja Academy]]{{sup/9|S}}/[[Uva Academy]]{{sup/9|V}} | |||
| All [[Poké Mart]]s (after earning 1 [[Badge|Gym Badges]]), [[Porto Marinada Market|Porto Marinada auction]] | |||
|- | |||
| {{gameabbrev9|SV}}{{gameabbrev9|TM}} | |||
| [[Oni Mountain]], [[Timeless Woods]], [[Wistful Fields]] | |||
| {{DL|Mossui Town|Peachy's}} (after earning 1 [[Badge|Gym Badge]]) | |||
|- | |||
| {{gameabbrev9|SV}}{{gameabbrev9|ID}} | |||
| [[Canyon Biome]], [[Coastal Biome]], [[Polar Biome]] | |||
| [[Vending machine]]s ([[Terarium]])<br>[[Item Printer]] (Poké Ball Lotto) | |||
|} | |} | ||
|} | |} | ||
=== | ====Distribution==== | ||
{| class="roundy" style="background: #{{Poké Balls color light}}; border: 5px solid #{{Poké Balls color}}" | |||
|- | |||
| | |||
{| border=1 style="background:#FFF; border:1px solid #{{Poké Balls color light}}; border-collapse:collapse" | |||
|- | |||
! style="background:#FFF; {{roundytl|5px}}" | Games | |||
! style="background:#FFF" | Event | |||
! style="background:#FFF" | Language/Region | |||
! style="background:#FFF; {{roundytr|5px}}" | Distribution period | |||
|- style="background:#FFF;" | |||
| {{gameabbrev8|SwSh}} | |||
| {{DL|List of other event distributions in Generation VIII|Wild Area News Heal Balls}} | |||
| All | |||
| January 31 to March 30, 2020 | |||
|- style="background:#FFF;" | |||
| {{gameabbrev9|SV}} | |||
| {{DL|List of other event distributions in Generation IX|Variety Ball Sets}} | |||
| Japan | |||
| November 18, 2022 to March 7, 2023 | |||
|} | |||
|} | |||
===NPC usage=== | |||
====Pokémon Sun, Moon, Ultra Sun, and Ultra Moon==== | ====Pokémon Sun, Moon, Ultra Sun, and Ultra Moon==== | ||
During [[Episode RR]] in [[Pokémon Ultra Sun and Ultra Moon|Ultra Sun and Ultra Moon]], [[Lillie]] keeps her {{p|Clefairy}} in a Heal Ball. | |||
{{tc|Pokémon Center Lady|Pokémon Center Ladies}} keep their Pokémon in Heal Balls. | |||
====Pokémon Sword and Shield==== | ====Pokémon Sword and Shield==== | ||
The following {{DL|Pokémon Trainer|Trainer class}}es keep their Pokémon in Heal Balls: | |||
* {{tc|Pokémon Breeder}} | * {{tc|Pokémon Breeder}} | ||
| Line 97: | Line 154: | ||
* {{tc|Gym Trainer}} ([[Ballonlea Stadium|Ballonlea]]) | * {{tc|Gym Trainer}} ([[Ballonlea Stadium|Ballonlea]]) | ||
==Artwork== | ====Pokémon Scarlet and Violet==== | ||
[[Eri]] keeps her Pokémon in Heal Balls. | |||
==Gallery== | |||
===Artwork=== | |||
{| style="margin:auto; text-align:center; {{roundy|20px}} border: 2px solid #{{Poké Balls color dark}}; background: #{{Poké Balls color}}; font-size: 80%" | {| style="margin:auto; text-align:center; {{roundy|20px}} border: 2px solid #{{Poké Balls color dark}}; background: #{{Poké Balls color}}; font-size: 80%" | ||
|- | |- | ||
|style="{{roundy|80px}} border: 2px solid #{{Poké Balls color dark}}; background: #{{Poké Balls color light}}"| [[File:SugimoriHealBall.png|100px]] | |style="{{roundy|80px}} border: 2px solid #{{Poké Balls color dark}}; background: #{{Poké Balls color light}}"| [[File:SugimoriHealBall.png|100px]] | ||
|style="{{roundy|80px}} border: 2px solid #{{Poké Balls color dark}}; background: #{{Poké Balls color light}}"| [[File:Bag Heal Ball SV Sprite.png|100px]] | |||
|- | |- | ||
| Artwork by<br>{{color2|000|Ken Sugimori}} | | Artwork by<br>{{color2|000|Ken Sugimori}} | ||
| Artwork from<br>{{color2|000|Pokémon Scarlet and Violet|Scarlet and Violet}} | |||
|} | |} | ||
| Line 110: | Line 173: | ||
|style="{{roundy|80px}} border: 2px solid #{{Poké Balls color dark}}; background: #{{Poké Balls color light}}"| [[File:Heal Ball summary IV.png]] | |style="{{roundy|80px}} border: 2px solid #{{Poké Balls color dark}}; background: #{{Poké Balls color light}}"| [[File:Heal Ball summary IV.png]] | ||
|style="{{roundy|80px}} border: 2px solid #{{Poké Balls color dark}}; background: #{{Poké Balls color light}}"| [[File:Heal Ball battle IV.png]] | |style="{{roundy|80px}} border: 2px solid #{{Poké Balls color dark}}; background: #{{Poké Balls color light}}"| [[File:Heal Ball battle IV.png]] | ||
|style="{{roundy|80px}} border: 2px solid #{{Poké Balls color dark}}; background: #{{Poké Balls color light}}"| [[File:Heal Ball summary PBR.png]] | |||
|style="{{roundy|80px}} border: 2px solid #{{Poké Balls color dark}}; background: #{{Poké Balls color light}}"| [[File:Heal Ball battle V.png]] | |style="{{roundy|80px}} border: 2px solid #{{Poké Balls color dark}}; background: #{{Poké Balls color light}}"| [[File:Heal Ball battle V.png]] | ||
|- | |- | ||
| Summary sprite from<br>{{color2|000|Generation IV|Generations IV}} and {{color2|000|Generation V|V}} | | Summary sprite from<br>{{color2|000|Generation IV|Generations IV}} and {{color2|000|Generation V|V}} | ||
| In-battle sprite in<br>{{color2|000|Generation IV}} | | In-battle sprite in<br>{{color2|000|Generation IV}} | ||
| Summary sprite from<BR>{{color2|000|Pokémon Battle Revolution|Battle Revolution}} | |||
| In-battle sprite in<br>{{color2|000|Generation V}} | | In-battle sprite in<br>{{color2|000|Generation V}} | ||
|} | |} | ||
===Models=== | ===Models=== | ||
{| style="margin:auto; text-align:center; {{roundy|20px}} border: 2px solid #{{Poké Balls color dark}}; background: #{{Poké Balls color}}; font-size: 80%" | {| style="margin:auto; text-align:center; {{roundy|20px}} border:2px solid #{{Poké Balls color dark}}; background:#{{Poké Balls color}}; font-size:80%" | ||
|- | |- | ||
|style="{{roundy|80px}} border: 2px solid #{{Poké Balls color dark}}; background: #{{Poké Balls color light}}"| [[File:Heal Ball battle 3DS.png|100px]] | |style="{{roundy|80px}} border:2px solid #{{Poké Balls color dark}}; background:#{{Poké Balls color light}}"| [[File:Heal Ball battle 3DS.png|100px]] | ||
|style="{{roundy|80px}} border: 2px solid #{{Poké Balls color dark}}; background: #{{Poké Balls color light}}"| [[File:Heal Ball VIII.png|100px]] | |style="{{roundy|80px}} border:2px solid #{{Poké Balls color dark}}; background:#{{Poké Balls color light}}"| [[File:Heal Ball VIII.png|100px]] | ||
|- | |- | ||
| In-battle model<br>{{color2|000|Pokémon X and Y|X, Y}}, {{color2|000|Pokémon Omega Ruby and Alpha Sapphire|Omega Ruby,<br>Alpha Sapphire}}, {{color2|000|Pokémon Sun and Moon|Sun, Moon}},<br>{{color2|000|Pokémon Ultra Sun and Ultra Moon|Ultra Sun, and Ultra Moon}} | | In-battle model<br>{{color2|000|Pokémon X and Y|X, Y}}, {{color2|000|Pokémon Omega Ruby and Alpha Sapphire|Omega Ruby,<br>Alpha Sapphire}}, {{color2|000|Pokémon Sun and Moon|Sun, Moon}},<br>{{color2|000|Pokémon Ultra Sun and Ultra Moon|Ultra Sun, and Ultra Moon}} | ||
| Line 127: | Line 192: | ||
|} | |} | ||
==In | ==In animation== | ||
[[File:Heal Ball anime.png|thumb|250px|A Heal Ball in | [[File:Heal Ball anime.png|thumb|250px|A Heal Ball in {{aniseries|XY}}]] | ||
A Heal Ball appeared in [[Which One ~ Is It?]], a Japanese ending theme from the {{ | ===''Pokémon the Series''=== | ||
===={{aniseries|DP}}==== | |||
A Heal Ball appeared in [[Which One ~ Is It?]], a Japanese ending theme from ''[[Pokémon the Series: Diamond and Pearl]]''. | |||
===={{aniseries|XY}}==== | |||
Starting from ''[[XY060|A Showcase Debut!]]'', {{an|Serena}} carries a pink [[Bag|backpack]] with the Heal Ball pattern. | |||
In ''[[XY079|A Frenzied Factory Fiasco!]]'', Heal Balls were seen being manufactured at the [[Poké Ball Factory]]. | In ''[[XY079|A Frenzied Factory Fiasco!]]'', Heal Balls were seen being manufactured at the [[Poké Ball Factory]]. | ||
===={{aniseries|SM}}==== | |||
In ''[[SM053|Rescuing the Unwilling!]]'', {{an|Gladion}} was revealed to keep his {{TP|Gladion|Umbreon}} in a Heal Ball. | In ''[[SM053|Rescuing the Unwilling!]]'', {{an|Gladion}} was revealed to keep his {{TP|Gladion|Umbreon}} in a Heal Ball. | ||
In ''[[SM062|Acting True to Form!]]'', a Heal Ball appeared as a part of [[James]]'s Poké Ball collection. | In ''[[SM062|Acting True to Form!]]'', a Heal Ball appeared as a part of [[James]]'s Poké Ball collection. It reappeared in ''[[JN026|Splash, Dash, and Smash for the Crown!]]''. | ||
{{-}} | {{-}} | ||
| Line 159: | Line 230: | ||
[[es:Sana Ball]] | [[es:Sana Ball]] | ||
[[fr:Soin Ball]] | [[fr:Soin Ball]] | ||
[[it: | [[it:Cura Ball]] | ||
[[ja:ヒールボール]] | [[ja:ヒールボール]] | ||
[[zh:治愈球(道具)]] | [[zh:治愈球(道具)]] | ||
Latest revision as of 20:17, 26 October 2024
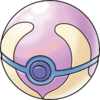
The Heal Ball (Japanese: ヒールボール Heal Ball) is a type of Poké Ball introduced in Generation IV. It can be used to catch a wild Pokémon. A Pokémon caught in a Heal Ball is fully healed.
In the core series games
Price
|
Effect
Manual activation
When used from the Bag in a wild encounter, it attempts to catch the wild Pokémon with a catch rate modifier of 1×.
If caught, the Pokémon's HP, PP, and status are fully restored. From Generation IV to VII, since Pokémon sent to the Pokémon Storage System are fully healed, this healing is only applicable if the caught Pokémon is placed in the party (in games in which Pokémon sent to the Pokémon Storage System are not healed, it is applicable regardless).
If used on an Ultra Beast, the catch rate modifier is instead always set to 410/4096× (~0.1×).
Held item
Fling fails if the user is holding a Heal Ball.
Description
|
Acquisition
|
Distribution
|
NPC usage
Pokémon Sun, Moon, Ultra Sun, and Ultra Moon
During Episode RR in Ultra Sun and Ultra Moon, Lillie keeps her Clefairy in a Heal Ball.
Pokémon Center Ladies keep their Pokémon in Heal Balls.
Pokémon Sword and Shield
The following Trainer classes keep their Pokémon in Heal Balls:
Pokémon Scarlet and Violet
Eri keeps her Pokémon in Heal Balls.
Gallery
Artwork

|
|
| Artwork by Ken Sugimori |
Artwork from Scarlet and Violet |
Sprites
| Summary sprite from Generations IV and V |
In-battle sprite in Generation IV |
Summary sprite from Battle Revolution |
In-battle sprite in Generation V |
Models

|

|
| In-battle model X, Y, Omega Ruby, Alpha Sapphire, Sun, Moon, Ultra Sun, and Ultra Moon |
Model from Generation VIII |
In animation

Pokémon the Series
Pokémon the Series: Diamond and Pearl
A Heal Ball appeared in Which One ~ Is It?, a Japanese ending theme from Pokémon the Series: Diamond and Pearl.
Pokémon the Series: XY
Starting from A Showcase Debut!, Serena carries a pink backpack with the Heal Ball pattern.
In A Frenzied Factory Fiasco!, Heal Balls were seen being manufactured at the Poké Ball Factory.
Pokémon the Series: Sun & Moon
In Rescuing the Unwilling!, Gladion was revealed to keep his Umbreon in a Heal Ball.
In Acting True to Form!, a Heal Ball appeared as a part of James's Poké Ball collection. It reappeared in Splash, Dash, and Smash for the Crown!.
In other languages
| |||||||||||||||||||||||||||||||

|
This item article is part of Project ItemDex, a Bulbapedia project that aims to write comprehensive articles on all items. |