Desolate Canyon: Difference between revisions
m (r2.7.6) (Robot: Adding fr:Vallée Dévastée) |
Bulbasaur32 (talk | contribs) |
||
| (15 intermediate revisions by 8 users not shown) | |||
| Line 4: | Line 4: | ||
|bordercolorscheme=Water | |bordercolorscheme=Water | ||
|name=Desolate Canyon | |name=Desolate Canyon | ||
|jname= | |jname={{tt|荒|あ}}れ{{tt|果|は}}て{{tt|谷|だに}} | ||
|jtrans=Desolate Valley | |jtrans=Desolate Valley | ||
|image=Desolate Canyon PMDGTI.png | |image=Desolate Canyon PMDGTI.png | ||
|size=300px | |||
|recruitable=Yes | |recruitable=Yes | ||
|floors=7 | |floors=7 | ||
| Line 12: | Line 13: | ||
|traps=No | |traps=No | ||
|monsterhouses=No | |monsterhouses=No | ||
|items= | |items=Current | ||
|money=Allowed | |money=Allowed | ||
|teamsize=4 | |teamsize=4 | ||
|startlevel=Current | |startlevel=Current | ||
|maintype= | |maintype=None | ||
|boss= | |boss={{p|Venipede}} ×2, {{p|Galvantula}} ×2, {{p|Pawniard}} ×2 | ||
}} | }} | ||
'''Desolate Canyon''' (Japanese: '''{{tt| | '''Desolate Canyon''' (Japanese: '''{{tt|荒|あ}}れ{{tt|果|は}}て{{tt|谷|だに}}''' ''Desolate Valley'') is a playable dungeon the {{player}} goes through in [[Pokémon Mystery Dungeon: Gates to Infinity]]. It has seven floors and six bosses. After the main storyline, this dungeon can be used to enter [[Glacier Palace]] with a high aura level. | ||
==Pokémon encountered== | ==Pokémon encountered== | ||
===Desolate Canyon=== | ===Desolate Canyon=== | ||
{{mdloc/h|Rock}} | {{mdloc/h|Rock|Water}} | ||
{{mdloc|453|Croagunk| | {{mdloc|453|Croagunk|1F-7F|9|?}} | ||
{{mdloc|522|Blitzle| | {{mdloc|522|Blitzle|1F-7F|10|?}} | ||
{{mdloc|548|Petilil| | {{mdloc|548|Petilil|1F-7F|9|?}} | ||
{{mdloc|566|Archen| | {{mdloc|566|Archen|1F-7F|13|?}} | ||
{{mdloc|590|Foongus| | {{mdloc|590|Foongus|1F-7F|14|?}} | ||
{{mdloc|600|Klang| | {{mdloc|600|Klang|1F-7F|38|?}} | ||
{{mdloc|607|Litwick| | {{mdloc|607|Litwick|1F-7F|12|?}} | ||
{{mdloc|629|Vullaby| | {{mdloc|629|Vullaby|1F-7F|11|?}} | ||
{{mdloc|543|Venipede|Cliffside|?| | {{mdloc|543|Venipede|Cliffside|12/13|?|pnote=×2|boss=yes}} | ||
{{mdloc|596|Galvantula|Cliffside|?| | {{mdloc|596|Galvantula|Cliffside|14/15|?|pnote=×2|boss=yes}} | ||
{{mdloc|624|Pawniard|Cliffside|?| | {{mdloc|624|Pawniard|Cliffside|16/17|?|pnote=×2|boss=yes}} | ||
{{mdloc/f|Rock}} | {{mdloc/f|Rock}} | ||
=== | ===[[Gilded Hall]]=== | ||
{{mdloc/h|Rock}} | {{mdloc/h|Rock|Water}} | ||
{{mdloc|279|Pelipper| | {{mdloc|279|Pelipper|1F-3F|35|?}} | ||
{{mdloc|373|Salamence| | {{mdloc|373|Salamence|1F-3F|50|?}} | ||
{{mdloc|547|Whimsicott| | {{mdloc|547|Whimsicott|1F-3F|17|?}} | ||
{{mdloc|567|Archeops| | {{mdloc|567|Archeops|1F-3F|37|?}} | ||
{{mdloc/f|Rock}} | {{mdloc/f|Rock}} | ||
==Items== | ==Items== | ||
{{DungeonItem/h|rock}} | {{DungeonItem/h|rock}} | ||
{{DungeonItem|Poké|4=32-90|sprite=Poké currency|3= | {{DungeonItem|Poké|4=32-90|sprite=Poké currency V|3=1F-7}} | ||
{{DungeonItem|Oran Berry|3= | {{DungeonItem|Oran Berry|sprite=MDBag Oran Berry V Sprite|3=1F-7}} | ||
{{DungeonItem| | {{DungeonItem|Pecha Berry|sprite=MDBag Pecha Berry V Sprite|3=1F-7}} | ||
{{DungeonItem| | {{DungeonItem|Rawst Berry|sprite=MDBag Rawst Berry V Sprite|3=1F-7}} | ||
{{DungeonItem| | {{DungeonItem|Chesto Berry|sprite=MDBag Chesto Berry VI Sprite|3=1F-7}} | ||
{{DungeonItem| | {{DungeonItem|Cheri Berry|sprite=MDBag Cheri Berry V Sprite|3=1F-7}} | ||
{{DungeonItem|Health Orb|Wonder Orb|3= | {{DungeonItem|Health Orb|Wonder Orb|sprite=MDBag Wonder Orb V Sprite|3=1F-7}} | ||
{{DungeonItem|All-Dodge Orb|Wonder Orb|3= | {{DungeonItem|All-Dodge Orb|Wonder Orb|sprite=MDBag Wonder Orb V Sprite|3=1F-7}} | ||
{{DungeonItem|Foe-Hold Orb|Wonder Orb|3= | {{DungeonItem|Foe-Hold Orb|Wonder Orb|sprite=MDBag Wonder Orb V Sprite|3=1F-7}} | ||
{{DungeonItem|Rollcall Orb|Wonder Orb|3= | {{DungeonItem|Rollcall Orb|Wonder Orb|sprite=MDBag Wonder Orb V Sprite|3=1F-7}} | ||
{{DungeonItem|Petrify Orb|Wonder Orb|3= | {{DungeonItem|Petrify Orb|Wonder Orb|sprite=MDBag Wonder Orb V Sprite|3=1F-7}} | ||
{{DungeonItem|Escape Orb|Wonder Orb|3= | {{DungeonItem|Escape Orb|Wonder Orb|sprite=MDBag Wonder Orb V Sprite|3=1F-7}} | ||
{{DungeonItem|Totter Orb|Wonder Orb|3= | {{DungeonItem|Totter Orb|Wonder Orb|sprite=MDBag Wonder Orb V Sprite|3=1F-7}} | ||
{{DungeonItem|Power Band|Scarf (Mystery Dungeon)|3= | {{DungeonItem|Power Band|Scarf (Mystery Dungeon)|3=1F-7|sprite=MDBag Scarf V Sprite}} | ||
{{DungeonItem|Zinc Band|Scarf (Mystery Dungeon)|3= | {{DungeonItem|Zinc Band|Scarf (Mystery Dungeon)|3=1F-7|sprite=MDBag Scarf V Sprite}} | ||
{{DungeonItem|Cover Band|Scarf (Mystery Dungeon)|3= | {{DungeonItem|Cover Band|Scarf (Mystery Dungeon)|3=1F-7|sprite=MDBag Scarf V Sprite}} | ||
{{DungeonItem|Blast Seed|Seed|3= | {{DungeonItem|Blast Seed|Seed|sprite=MDBag Seed V Sprite|3=1F-7}} | ||
{{DungeonItem|Heal Seed|Seed|3= | {{DungeonItem|Heal Seed|Seed|sprite=MDBag Seed V Sprite|3=1F-7}} | ||
{{DungeonItem|Max Elixir|Health drink|sprite=MDBag | {{DungeonItem|Max Elixir|Health drink|sprite=MDBag Max Elixir V Sprite|3=1F-7}} | ||
|} | {{DungeonItem/f|rock}} | ||
==Gallery== | ==Gallery== | ||
<gallery> | <gallery> | ||
Archen PMDGTI.png|Desolate Canyon 1F Archen enemy | |||
Desolate Canyon boss area PMDGTI.png|Desolate Canyon boss area | |||
Desolate Canyon boss battle PMDGTI.png|Desolate Canyon boss area battle | |||
</gallery> | </gallery> | ||
==In other languages== | ==In other languages== | ||
{{langtable|color={{rock color light}}|bordercolor={{water color}} | {{langtable|color={{rock color light}}|bordercolor={{water color}} | ||
|fr=Vallée Dévastée | |fr=Vallée Dévastée | ||
|de=Kargschlucht | |de=Kargschlucht | ||
|it=Valle Abbandonata | |it=Valle Abbandonata | ||
| Line 91: | Line 92: | ||
[[de:Kargschlucht]] | [[de:Kargschlucht]] | ||
[[es:Desfiladero Umbrío]] | |||
[[fr:Vallée Dévastée]] | [[fr:Vallée Dévastée]] | ||
[[it:Valle Abbandonata]] | |||
[[ja:荒れ果て谷]] | [[ja:荒れ果て谷]] | ||
[[zh:荒廢山谷]] | |||
Latest revision as of 05:45, 12 February 2022
|
|
|
| ||||||||||||||||||||||||||||||||||||||||||
| ||||||||||||||||||||||||||||||||||||||||||
| ||||||||||||||||||||||||||||||||||||||||||
| ||||||||||||||||||||||||||||||||||||||||||

Desolate Canyon (Japanese: 荒れ果て谷 Desolate Valley) is a playable dungeon the player goes through in Pokémon Mystery Dungeon: Gates to Infinity. It has seven floors and six bosses. After the main storyline, this dungeon can be used to enter Glacier Palace with a high aura level.
Pokémon encountered
Desolate Canyon
| Pokémon | Floors | Levels | Recruit Rate | |
|---|---|---|---|---|
| Croagunk | 1F-7F | 9 | ?% | |
| Blitzle | 1F-7F | 10 | ?% | |
| Petilil | 1F-7F | 9 | ?% | |
| Archen | 1F-7F | 13 | ?% | |
| Foongus | 1F-7F | 14 | ?% | |
| Klang | 1F-7F | 38 | ?% | |
| Litwick | 1F-7F | 12 | ?% | |
| Vullaby | 1F-7F | 11 | ?% | |
| Venipede ×2 | Cliffside | 12/13 | ?% Boss | |
| Galvantula ×2 | Cliffside | 14/15 | ?% Boss | |
| Pawniard ×2 | Cliffside | 16/17 | ?% Boss | |
Gilded Hall
| Pokémon | Floors | Levels | Recruit Rate | |
|---|---|---|---|---|
| Pelipper | 1F-3F | 35 | ?% | |
| Salamence | 1F-3F | 50 | ?% | |
| Whimsicott | 1F-3F | 17 | ?% | |
| Archeops | 1F-3F | 37 | ?% | |
Items
| Item | Floors | |||||||
|---|---|---|---|---|---|---|---|---|
| 32-90 Poké | 1F-7F | |||||||
| Oran Berry | 1F-7F | |||||||
| Pecha Berry | 1F-7F | |||||||
| Rawst Berry | 1F-7F | |||||||
| Chesto Berry | 1F-7F | |||||||
| Cheri Berry | 1F-7F | |||||||
| Health Orb | 1F-7F | |||||||
| All-Dodge Orb | 1F-7F | |||||||
| Foe-Hold Orb | 1F-7F | |||||||
| Rollcall Orb | 1F-7F | |||||||
| Petrify Orb | 1F-7F | |||||||
| Escape Orb | 1F-7F | |||||||
| Totter Orb | 1F-7F | |||||||
| Power Band | 1F-7F | |||||||
| Zinc Band | 1F-7F | |||||||
| Cover Band | 1F-7F | |||||||
| Blast Seed | 1F-7F | |||||||
| Heal Seed | 1F-7F | |||||||
| Max Elixir | 1F-7F | |||||||
Gallery
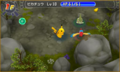
Desolate Canyon 1F Archen enemy
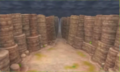
Desolate Canyon boss area
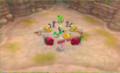
Desolate Canyon boss area battle


In other languages
| ||||||||||||||||||
| This article is part of both Project Locations and Project Sidegames, Bulbapedia projects that, together, aim to write comprehensive articles on the Pokémon Locations and Sidegames, respectively. |