Appendix:Pokémon Pinball walkthrough/Section 3
Field Features
Catch 'Em Mode
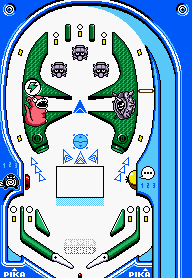
Catch 'Em Mode can be activated by sending the ball through the right loop twice, lighting up two Catch 'Em arrows, then sending the ball into Cloyster. Some Pokémon will only appear when all three Catch 'Em arrows are lit, however. Also, there are special Pokémon that can be caught in Catch 'Em mode.
Evolution Mode
Sending the ball through the left loop three times and to the Slowpoke's open mouth will activate Evolution mode.
Map Mode
Hitting the Poliwag or Psyduck on either side of the field three times and then into Slowpoke's mouth or Cloyster's mouth will initiate map mode. The player will pass through three locations in Area one, two locations in Area two, and then to the Indigo Plateau. After that, they will return to a location in Area one.
Area one locations include: Viridian City, Viridian Forest, Mt. Moon, Cerulean City, Vermilion City Streets, Rock Mountain, and Celadon City.
Area two locations include: Fuchsia City, Safari Zone, Saffron City, and Cinnabar Island.
Bonus Stages
The Bonus Stages for the Red Field are the Meowth Stage, the Seel Stage, and the Mewtwo Stage.
More information on the Bonus Stages can be found in the Bonus Stage section of the walkthrough.
Locations and Catch 'em Pokémon
These are the Pokémon that can be encountered in through Catch 'em Mode. The Catch 'em Arrow value is the minimal number of Catch 'em arrows that need to be lit to encounter that Pokémon.
Viridian City
| Pokémon | Catch 'em Arrows |
|---|---|
| Spearow | 2 |
| Nidoran♀ | 2 |
| Nidoran♂ | 2 |
| Bulbasaur | 3 |
| Squirtle | 3 |
| Poliwag | 3 |
| Tentacool | 3 |
| Goldeen | 3 |
Viridian Forest
| Pokémon | Catch 'em Arrows |
|---|---|
| Caterpie | 2 |
| Weedle | 2 |
| Pidgey | 2 |
| Rattata | 2 |
| Pikachu | 3 |
Mt. Moon
| Pokémon | Catch 'em Arrows |
|---|---|
| Rattata | 2 |
| Spearow | 2 |
| Ekans | 2 |
| Sandshrew | 2 |
| Zubat | 2 |
| Paras | 2 |
| Clefairy | 3 |
| Psyduck | 3 |
| Geodude | 3 |
| Krabby | 3 |
| Goldeen | 3 |
Cerulean City
| Pokémon | Catch 'em Arrows |
|---|---|
| Caterpie | 2 |
| Weedle | 2 |
| Pidgey | 2 |
| Nidoran♂ | 2 |
| Oddish | 2 |
| Bellsprout | 2 |
| Meowth | 3 |
| Psyduck | 3 |
| Abra | 3 |
| Krabby | 3 |
| Goldeen | 3 |
| Jynx | 3 |
Vermilion City Streets
| Pokémon | Catch 'em Arrows |
|---|---|
| Pidgey | 2 |
| Spearow | 2 |
| Bellsprout | 2 |
| Shellder | 2 |
| Krabby | 2 |
| Farfetch’d | 3 |
| Sandshrew | 3 |
| Meowth | 3 |
| Drowzee | 3 |
Rock Mountain
| Pokémon | Catch 'em Arrows |
|---|---|
| Spearow | 2 |
| Ekans | 2 |
| Sandshrew | 2 |
| Zubat | 2 |
| Diglett | 2 |
| Machop | 2 |
| Geodude | 2 |
| Slowpoke | 3 |
| Onix | 3 |
| Voltorb | 3 |
| Mr. Mime | 3 |
Celadon City
| Pokémon | Catch 'em Arrows |
|---|---|
| Pidgey | 2 |
| Oddish | 2 |
| Meowth | 2 |
| Mankey | 2 |
| Growlithe | 2 |
| Bellsprout | 2 |
| Clefairy | 3 |
| Abra | 3 |
| Scyther | 3 |
| Pinsir | 3 |
| Eevee | 3 |
| Porygon | 3 |
| Dratini | 3 |
Fuchsia City
| Pokémon | Catch 'em Arrows |
|---|---|
| Krabby | 2 |
| Goldeen | 2 |
| Magikarp | 2 |
| Venonat | 3 |
| Exeggcute | 3 |
| Kangaskhan | 3 |
Safari Zone
| Pokémon | Catch 'em Arrows |
|---|---|
| Nidoran♀ | 2 |
| Nidoran♂ | 2 |
| Paras | 2 |
| Doduo | 2 |
| Rhyhorn | 2 |
| Chansey | 3 |
| Scyther | 3 |
| Pinsir | 3 |
| Tauros | 3 |
| Dratini | 3 |
Saffron City
| Pokémon | Catch 'em Arrows |
|---|---|
| Pidgey | 2 |
| Ekans | 2 |
| Sandshrew | 2 |
| Oddish | 2 |
| Mankey | 2 |
| Bellsprout | 2 |
| Vulpix | 3 |
| Meowth | 3 |
| Growlithe | 3 |
| Hitmonlee | 3 |
| Hitmonchan | 3 |
| Lapras | 3 |
Cinnabar Island
| Pokémon | Catch 'em Arrows |
|---|---|
| Vulpix | 2 |
| Ponyta | 2 |
| Grimer | 2 |
| Koffing | 2 |
| Magmar | 3 |
| Aerodactyl | 3 |
Indigo Plateau
| Pokémon | Catch 'em Arrows |
|---|---|
| Spearow | 2 |
| Ekans | 2 |
| Sandshrew | 2 |
| Zubat | 2 |
| Machop | 2 |
| Geodude | 2 |
| Onix | 3 |
| Ditto | 3 |
| Moltres | 3 |
| Mewtwo | 3 |
| Mew | 3 |
|
Pokémon Pinball walkthrough |
|
| This article is part of Project Walkthroughs, a Bulbapedia project that aims to write comprehensive step-by-step guides on each Pokémon game. |
