This is the Bulbapedia walkthrough for Pokémon Omega Ruby and Alpha Sapphire.
These pages follow the remade Nintendo 3DS iteration, not Pokémon Ruby and Sapphire. The guide for those games can be found here.
Route 128
Route 128 is situated between Route 127 to the north, Route 129 to the south, and Ever Grande City to the east. Captain Stern mentioned that he'd found an underwater cave here while exploring in his submarine. Team MagmaOR/Team AquaAS has now breached that same cavern with their stolen, souped-up sub. Whatever mysteries lie below, one thing is clear: this is the place where that giant pillar of light burst forth from the ocean, so something big must be happening beneath the waves!
| Trainers
|
| Trainer
|
Pokémon
|
|
|
|
|
|
|
|
|
|
|
|
|
|
|
|
|
|
|
|
|
|
|
|
|
|
|
|
| Underwater
|
|
|
|
|
|
| Rematch
|
|
|
|
|
|
|
|
|
|
|
|
| Trainers with a PokéNav by their names will be registered in the Trainer's Eyes or Match Call function after the first battle, and may have a rematch with the player with higher-level Pokémon.
|
|
| Available Pokémon
|
| Water's surface
|
| Pokémon
|
Games
|
Location
|
Levels
|
Rate
|
| Surfing
|
|
|
OR
|
AS
|
|
25
|
50%
|
|
|
OR
|
AS
|
|
25, 30, 35
|
35%
|
|
|
OR
|
AS
|
|
30
|
15%
|
| Fishing
|
|
|
OR
|
AS
|
|
10, 15
|
65%
|
|
|
OR
|
AS
|
|
5
|
35%
|
|
|
OR
|
AS
|
|
25
|
60%
|
|
|
OR
|
AS
|
|
25
|
35%
|
|
|
OR
|
AS
|
|
25
|
5%
|
|
|
OR
|
AS
|
|
35
|
60%
|
|
|
OR
|
AS
|
|
30
|
35%
|
|
|
OR
|
AS
|
|
40
|
5%
|
| A colored background means that the Pokémon can be found in this location in the specified game. A white background with a colored letter means that the Pokémon cannot be found here.
|
|
| Underwater
|
| Pokémon
|
Games
|
Location
|
Levels
|
Rate
|
|
|
OR
|
AS
|

|
Seaweed
|
|
25
|
50%
|
|
|
OR
|
AS
|
|
|
Seaweed
|
|
30
|
30%
|
|
|
OR
|
AS
|
|
|
Seaweed
|
|
30
|
15%
|
|
|
OR
|
AS
|
|
|
Seaweed
|
|
30
|
4%
|
|
|
OR
|
AS
|
|
|
Seaweed
|
|
35
|
1%
|
| A colored background means that the Pokémon can be found in this location in the specified game. A white background with a colored letter means that the Pokémon cannot be found here.
|
|
|
| Items
|
| Item
|
Location
|
Games
|

|
Heart Scale ×3
|
- South side of the sand ring (hidden)
- On the sandbar to the east of the sand ring (hidden)
- On the south-central island, west of the route sign (hidden)
|
OR AS
|
| Requires Dive
|

|
Stone Plate
|
Main area, northwest of the rocky ring (hidden)
|
OR AS
|

|
Draco Plate
|
Main area, west of the rocky ring (hidden)
|
OR AS
|

|
Pixie Plate
|
Main area, southeast of the Seafloor Cavern entrance (hidden)
|
OR AS
|

|
Adamant Orb
|
In the middle of the rocky ring, near the north wall (hidden)
|
OR AS
|

|
Protein
|
Eastern area, southwest part of the bare patch in the seaweed (hidden)
|
OR AS
|

|
Pearl
|
Eastern area, southeast of the seaweed patch (hidden)
|
OR AS
|
|
|
|

Seafloor Cavern, Entrance
RS
Seafloor Cavern, Room 1
RS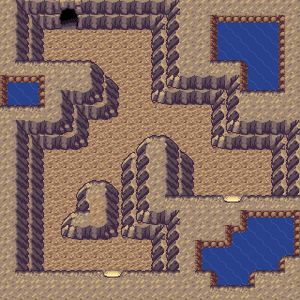
Seafloor Cavern, Room 2
RS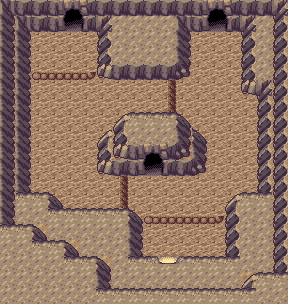
Seafloor Cavern, Room 3
RSSeafloor Cavern
The long-forgotten Seafloor Cavern can only be reached from an underwater cave in the depths of Route 128. MaxieOR/ArchieAS has gone to great lengths to breach the seal that has protected this place for ages, in the hope of awakening the super-ancient Pokémon rumored to dwell here. He believes this Pokémon has the power to bring about the great future he desires, but the risks seem far too great.
| Trainers
|
| Omega Ruby
|
| Trainer
|
Pokémon
|
| Room 1
|
|
|
|
|
|
|
|
|
|
|
| Room 2
|
|
|
|
| Room 3
|
|
|
|
| Room 7
|
|
|
|
|
|
|
|
|
| Alpha Sapphire
|
| Trainer
|
Pokémon
|
| Room 1
|
|
|
|
|
|
|
|
|
|
|
| Room 2
|
|
|
|
| Room 3
|
|
|

|
Muk♀
|
Lv.41
|
| No item
|
|
| Room 7
|
|
|
|
|
|
Muk♂
|
Lv.40
|
| No item
|
|
|
|
|
|
| Available Pokémon
|
| Entrance
|
| Pokémon
|
Games
|
Location
|
Levels
|
Rate
|
| Surfing
|
|
|
OR
|
AS
|
|
25, 30, 35
|
55%
|
|
|
OR
|
AS
|
|
30, 35
|
45%
|
| Fishing
|
|
|
OR
|
AS
|
|
5, 10
|
65%
|
|
|
OR
|
AS
|
|
10
|
35%
|
|
|
OR
|
AS
|
|
30
|
60%
|
|
|
OR
|
AS
|
|
30
|
35%
|
|
|
OR
|
AS
|
|
30
|
5%
|
|
|
OR
|
AS
|
|
30, 35, 40
|
100%
|
| A colored background means that the Pokémon can be found in this location in the specified game. A white background with a colored letter means that the Pokémon cannot be found here.
|
|
| Rooms 1, 2, 4
|
| Pokémon
|
Games
|
Location
|
Levels
|
Rate
|
|
|
OR
|
AS
|
|
33-36
|
100%
|
| Horde Encounter
|
|
|
OR
|
AS
|

|
Horde Encounter
|
|
18
|
100%
|
| Rock Smash
|
|
|
OR
|
AS
|
|
33-36
|
100%
|
| A colored background means that the Pokémon can be found in this location in the specified game. A white background with a colored letter means that the Pokémon cannot be found here.
|
|
| Rooms 5, 6
|
| Pokémon
|
Games
|
Location
|
Levels
|
Rate
|
|
|
OR
|
AS
|
|
33-36
|
100%
|
| Horde Encounter
|
|
|
OR
|
AS
|
|
|
Horde Encounter
|
|
18
|
100%
|
| Surfing
|
|
|
OR
|
AS
|
|
25, 30
|
65%
|
|
|
OR
|
AS
|
|
25, 30, 35
|
35%
|
| Fishing
|
|
|
OR
|
AS
|
|
10
|
65%
|
|
|
OR
|
AS
|
|
5
|
35%
|
|
|
OR
|
AS
|
|
25
|
60%
|
|
|
OR
|
AS
|
|
25
|
35%
|
|
|
OR
|
AS
|
|
25
|
5%
|
|
|
OR
|
AS
|
|
30, 35, 40
|
100%
|
| A colored background means that the Pokémon can be found in this location in the specified game. A white background with a colored letter means that the Pokémon cannot be found here.
|
|
| Rooms 3, 7, 8, 9
|
| Pokémon
|
Games
|
Location
|
Levels
|
Rate
|
|
|
OR
|
AS
|
|
33-36
|
100%
|
| Horde Encounter
|
|
|
OR
|
AS
|
|
|
Horde Encounter
|
|
18
|
100%
|
| A colored background means that the Pokémon can be found in this location in the specified game. A white background with a colored letter means that the Pokémon cannot be found here.
|
|
|
Entrance
When you surface inside the cavern, you find Captain Stern's sub moored in the shallows. Scan the shoreline for a hidden Heart Scale in the southeast, then take the north doorway to the next room.
Room 1
This room features two large boulders that hinder travel. Go northwest, clear the way with Rock Smash, then use Strength to drop the first into the nearby hole. Moving the second boulder is optional, as it only creates a minor shortcut. Walk up the stairway to the north and take the doorway to the southeast, battling two Grunts on the way.
Room 2
There's a Grunt nearby, pacing in a circle. Battle her then head south and push the boulder to the hole. The western path has a boulder that can't be moved successfully from this direction, so head through the doorway to the southeast instead.
Room 3
Jump down the ledge and fight the nearby Grunt. The doorway to the south merely leads back to the previous room. Inspect the southeast corner for a hidden Escape Rope, then go through the northeast doorway.
Room 4
Go northeast and push the first boulder westward to the hole. Head north then west from that boulder's starting position, and move this boulder westward until it hits a rock. Walk north from here and push the third boulder up against the north wall. Go east then south to find the fourth boulder sitting next to a cracked rock. Use Rock Smash on the cracked rock, then push the boulder west until it hits a rock. Walk southwest to the puzzle's staring point, then northeast to approach that same boulder from the opposite side. Push the boulder all the way eastward to the hole near the wall. Finally, move the nearest boulder a few paces southward to the hole in order to create a shortcut. Take the northeast doorway to the next room.
Room 7
This room has many strong water currents. Surf out into the water and ride the currents to a calm spot on the room's north side. From here, go south and ride the current to the island in the room's center, where you find TM55 (Scald). Swim west from the island and ride the current to the northwest. Climb onto the shoreline and go through the doorway to the north.
Room 6
Head north and battle the Grunt. Move the nearby boulder a few paces southward to the hole to create a shortcut, then go north through the next doorway.
Room 8
This room has eight large boulders that initially block any progress. Start by moving the two southernmost boulders west and east into the two nearby holes. Push the east-southeast boulder to the right, then move the west-southwest boulder two paces to the right. Next, move the west-northwest boulder two paces to the south. That should allow you to push the northwest boulder into the hole and walk across it to reach the north doorway.
Room 9
Go east, south, then west along the downward-sloping corridor. Be sure to grab TM26 (Earthquake) from the southwest corner before descending the stairway to the final room.
Room 10
In the depths of the Seafloor Cavern, you finally catch up to the villainous team's driven leader, MaxieOR/ArchieAS along with the other leader. He has discovered the fabled resting place of the super-ancient Pokémon, GroudonOR/KyogreAS, and stands ready to restore the creature with his stolen Red OrbOR/Blue OrbAS. He taunts Maxie/Archie and drags you into battle. He pulls out all the stops, even Mega Evolving his prized Pokémon in an attempt to quash you once and for all!
VS MaxieOR

|
|
Reward: $6,880
|
|
|
|
|
|
|
VS ArchieAS
Even defeated, MaxieOR/ArchieAS reaffirms his intent to revive the super-ancient Pokémon. Before he can do so, TabithaOR/ShellyAS enters and tries to dissuade him from this plan, but it's no use. Seeing that he's not to be reasoned with, his Admin and his rival turn and flee the cavern. Holding the Red OrbOR/Blue OrbAS high, he finally succeeds in awakening GroudonOR/KyogreAS. It escapes the cavern with a loud cry and emerges at the water's surface, where the great energy it generates immediately changes Hoenn's weather to extremely harsh sunlightOR/heavy rainAS, a dramatic change that influences any battles on Hoenn's east side. The intense sunlight boosts all Fire moves and negates all Water moves by evaporating them on the spot. The massive downpours boost all Water moves and negate all Fire moves by dousing their flames. The super-ancient Pokémon is last seen moving northwest toward Sootopolis City.
Route 128
The group returns to the surface, where they witness the intense weather conditions. The super-ancient Pokémon hasn't even undergone Primal Reversion yet and its power is already beyond expectations, forcing MaxieOR/ArchieAS to grudgingly agree to work with his rival to set things right. GroudonOR/KyogreAS is believed to be heading to the Cave of Origin in the heart of Sootopolis, where a source of energy needed for Primal Reversion is said to be located. Once the others leave for the city, Steven swoops down to assess the situation. He's headed to Sootopolis as well, to investigate the sweltering heat waveOR/massive stormcloudsAS emanating from the city, and suggests you do the same.