Appendix:Emerald walkthrough/Section 15: Difference between revisions
NeoCrimson (talk | contribs) No edit summary |
|||
| (9 intermediate revisions by 6 users not shown) | |||
| Line 1: | Line 1: | ||
== | ==Shoal Cave (optional)== | ||
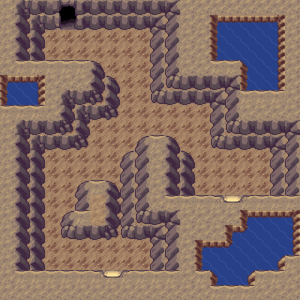
[[File: | [[File:Shoal Cave entrance high tide E.png|thumb|left|Shoal Cave, Entrance (high tide)]] | ||
[[File:Shoal Cave entrance low tide E.png|thumb|Shoal Cave, Entrance (low tide)]] | |||
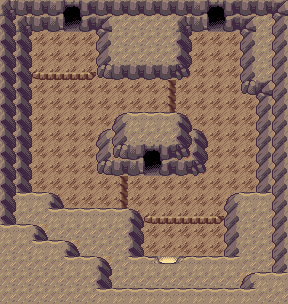
[[File:Shoal Cave inner room high tide E.png|left|thumb|Shoal Cave, Second Cavern (high tide)]] | |||
[[File:Shoal Cave inner room low tide E.png|thumb|Shoal Cave, Second Cavern (low tide)]] | |||
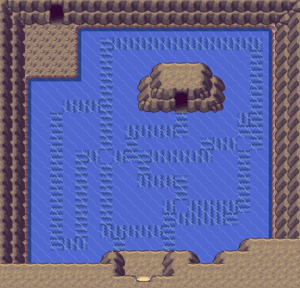
[[File:Shoal Cave ice room E.png|thumb|left|Shoal Cave, Ice Cavern (low tide)]] | |||
[[File:Shoal Cave lower room E.png|thumb|Shoal Cave, Third Cavern (low tide)]] | |||
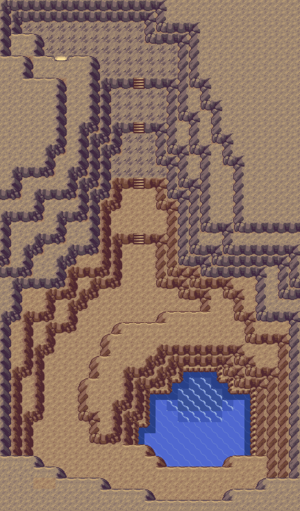
[[File:Shoal Cave stairs room E.png|thumb|Shoal Cave, Fourth Cavern (low tide)]] | |||
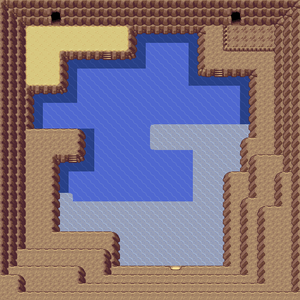
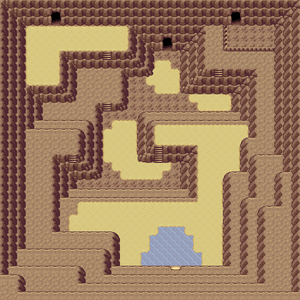
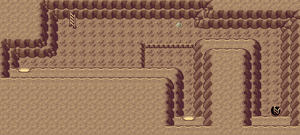
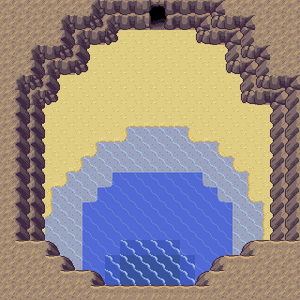
Connected to the ocean, the appearance of [[Shoal Cave]] changes with the {{DL|Shoal Cave|tides}}. Seawater floods the cave during high tide, closing off some areas and opening others. It then drains away during low tide, revealing new areas for exploration. The tides change every six hours, at 3:00 and 9:00. | |||
{| class="expandable | {| class="expandable" style="margin: auto; background: #{{locationcolor/med|cave}}; {{roundy}}; border: 5px solid #{{locationcolor/light|cave}};" | ||
|- align="center" | |- align="center" | ||
! Available Pokémon | ! Available Pokémon | ||
|- | |- | ||
| | | | ||
{{Catch/header|water|no}} | {| class="expandable" style="margin: auto; background: #{{locationcolor/med|{{#switch: {{#time: g}}|9|10|11|12|1|2=water|cave}}}}; {{roundy}}; border: 5px solid #{{locationcolor/light|{{#switch: {{#time: g}}|9|10|11|12|1|2=water|cave}}}};" | ||
|- align="center" | |||
! Main Cave | |||
|- | |||
| | |||
{{Catch/header|{{#switch: {{#time: g}}|9|10|11|12|1|2=water|cave}}|no}} | |||
{{Catch/entry3|363|Spheal|no|no|yes|Cave|26, 28, 30, 32|50%|type1=Ice|type2=Water}} | |||
{{Catch/entry3|041|Zubat|no|no|yes|Cave|26, 28, 30, 32|45%|type1=Poison|type2=Flying}} | |||
{{Catch/entry3|042|Golbat|no|no|yes|Cave|32|5%|type1=Poison|type2=Flying}} | |||
{{Catch/div|water|Surfing}} | {{Catch/div|water|Surfing}} | ||
{{Catch/entry3|072|Tentacool|no|no|yes|Surf|5-35|60%|type1=Water | {{Catch/entry3|072|Tentacool|no|no|yes|Surf|5-35|60%|type1=Water|type2=Poison}} | ||
{{Catch/entry3| | {{Catch/entry3|041|Zubat|no|no|yes|Surf|5-35|30%|type1=Poison|type2=Flying}} | ||
{{Catch/entry3| | {{Catch/entry3|363|Spheal|no|no|yes|Surf|25-35|10%|type1=Ice|type2=Water}} | ||
{{Catch/div|water|Fishing}} | {{Catch/div|water|Fishing}} | ||
{{Catch/entry3|129|Magikarp|no|no|yes|Fish Old|5-10|70%|type1=Water}} | {{Catch/entry3|129|Magikarp|no|no|yes|Fish Old|5-10|70%|type1=Water}} | ||
{{Catch/entry3|072|Tentacool|no|no|yes|Fish Old|5-10|30%|type1=Water|type2=Poison}} | {{Catch/entry3|072|Tentacool|no|no|yes|Fish Old|5-10|30%|type1=Water|type2=Poison}} | ||
{{ | {{Catch/entry3|129|Magikarp|no|no|yes|Fish Good|10-30|60%|type1=Water}} | ||
{{Catch/entry3|072|Tentacool|no|no|yes|Fish Good|10-30|20%|type1=Water|type2=Poison}} | |||
{{Catch/entry3|320|Wailmer|no|no|yes|Fish Good|10-30|20%|type1=Water}} | {{Catch/entry3|320|Wailmer|no|no|yes|Fish Good|10-30|20%|type1=Water}} | ||
{{Catch/entry3| | {{Catch/entry3|320|Wailmer|no|no|yes|Fish Super|20-45|100%|type1=Water}} | ||
{{Catch/entry3| | {{Catch/footer|{{#switch: {{#time: g}}|9|10|11|12|1|2=water|cave}}}} | ||
{{Catch/entry3| | |} | ||
{{Catch/entry3| | {| class="expandable" style="margin: auto; background: #{{locationcolor/med|ice}}; {{roundy}}; border: 5px solid #{{locationcolor/light|ice}};" | ||
{{Catch/footer|water}} | |- align="center" | ||
! Icy Cavern | |||
|- | |||
| | |||
{{Catch/header|snow|no}} | |||
{{Catch/entry3|363|Spheal|no|no|yes|Cave|26, 28, 30, 32|45%|type1=Ice|type2=Water}} | |||
{{Catch/entry3|041|Zubat|no|no|yes|Cave|26, 28, 30|40%|type1=Poison|type2=Flying}} | |||
{{Catch/entry3|361|Snorunt|no|no|yes|Cave|26, 28, 30|10%|type1=Ice}} | |||
{{Catch/entry3|042|Golbat|no|no|yes|Cave|30, 32|5%|type1=Poison|type2=Flying}} | |||
{{Catch/footer|snow}} | |||
|} | |||
|} | |||
{| class="expandable" style="margin: auto; background: #{{locationcolor/med|cave}}; {{roundy}}; border: 5px solid #{{locationcolor/light|cave}};" | |||
|- align="center" | |||
! Items | |||
|- | |||
| | |||
{{itlisth|cave}} | |||
{{catch/div|cave|All times}} | |||
{{itemlist|Shell Bell|Entrance, from the old man after handing over four [[Shoal Shell]]s and four [[Shoal Salt]]s|E=yes}} | |||
{{catch/div|water|High tide}} | |||
{{itemlist|Rare Candy|Second Cavern, east of the central ladder|E=yes}} | |||
{{itemlist|Big Pearl|Entrance; northeast ledge, accessible from second cavern|E=yes}} | |||
{{itemlist|Shoal Shell| | |||
* Second Cavern, near the southern bridge | |||
* Second Cavern, northwest corner | |||
* Second Cavern, northeast corner | |||
* Second Cavern, southeast corner|E=yes|display=[[Shoal Shell]] ×4}} | |||
{{catch/div|sand|Low tide}} | |||
{{itemlist|Shoal Salt| | |||
* Fourth Cavern, southeast corner | |||
* Third Cavern, north-central area | |||
* Second Cavern, southwest area | |||
* Second Cavern, under the north bridge|E=yes|display=[[Shoal Salt]] ×4}} | |||
{{itemlist|Ice Heal|Fourth Cavern, southeast corner|E=yes}} | |||
{{itemlist|Focus Band|Third Cavern, from the Black Belt|E=yes}} | |||
{{itemlist|Never-Melt Ice|Ice Cavern, south end of the central plateau|E=yes|display=[[Never-Melt Ice|NeverMeltIce]]}} | |||
{{itemlist|TM Ice|Ice Cavern, atop the ledge|E=yes|display={{TM|07|Hail}}}} | |||
{{itlistfoot|cave}} | |||
|} | |||
===High tide=== | |||
====Entrance==== | |||
An old man in the entry chamber offers to make a [[Shell Bell]] for your Pokémon. But first, he needs you to collect some of the cave's natural resources: [[Shoal Shell]]s and [[Shoal Salt]]s. These items are replenished each day, so there's no limit to the number you can collect. Once you hand over four of each item, he crafts the health-restoring item for you. Surf northwest and take the doorway there to reach the next chamber. | |||
====Second Cavern==== | |||
Surf along the water in a clockwise direction, collecting the four Shoal Shells and a [[Rare Candy]] on the way. Take the southeast doorway back to the entrance, where you can collect a [[Big Pearl]] on the nearby ledge. | |||
===Low tide=== | |||
====Entrance==== | |||
An old man in the entry chamber offers to make a [[Shell Bell]] for your Pokémon. But first, he needs you to collect some of the cave's natural resources: [[Shoal Shell]]s and [[Shoal Salt]]s. These items are replenished each day, so there's no limit to the number you can collect. Once you hand over four of each item, he crafts the health-restoring item for you. Head through the north doorway to reach the next chamber. | |||
====Second Cavern==== | |||
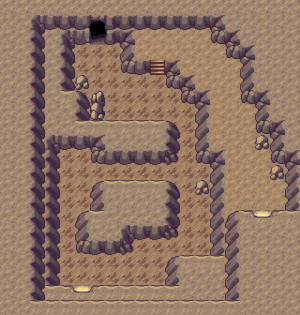
Head up the stairway, go north and climb down the east-central ladder. | |||
====Fourth Cavern==== | |||
Grab the Shoal Salt and [[Ice Heal]], then climb the hill to the ladder in the northwest. | |||
====Second Cavern==== | |||
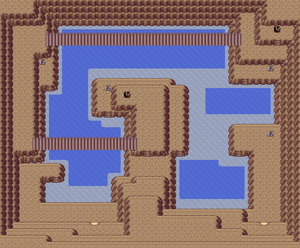
Go west then south along the two bridges, then climb down the ladder in the center. | |||
====Third Cavern==== | |||
Head east to meet a Black Belt and receive a [[Focus Band]] from him. Continue east to find another Shoal Salt, then use {{m|Strength}} to move the boulder eastward and descend the ladder to the south. | |||
====Ice Cavern==== | |||
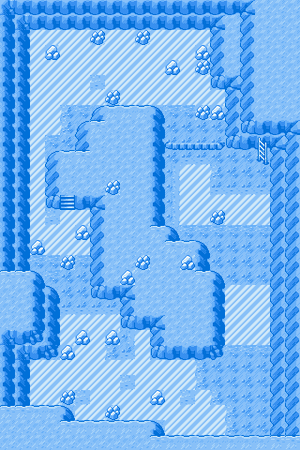
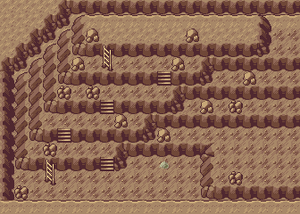
The final cavern is permanently encased in ice, and the slick floors hinder travel. Go south from the ladder, across two ice patches. At the third ice patch, slide west to the second snow patch within it. Slide north, then west and south to the third small snow patch. Slide south, east, then north to continue on. Slide north to the snow patch near the narrow stairway. Move west then south to a rock, then east and north to the central plateau and the [[Never-Melt Ice|NeverMeltIce]] on its south end. Slide south from the narrow stairway, then west and north to reach the northwest corner. Go east then south to a snow patch, then north to a rock near the room's northwest corner. Head east, south, and west, then move north, west, south, and west to the small snow patch. Slide north, east, then south to reach {{TM|07|Hail}} and jump the ledge to return to the ladder. | |||
{{-}} | |||
==Now that you can use Dive (optional)== | |||
There are many [[underwater]] treasures (as well as three underwater Pokémon) beneath the [[Abandoned Ship]] and {{rt|124|Hoenn}} you can collect. All underwater areas with seaweed have the same [[wild Pokémon]]. | |||
{| class="expandable" style="margin: auto; background: #{{locationcolor/med|ocean}}; {{roundy}}; border: 5px solid #{{locationcolor/light|ocean}};" | |||
|- align="center" | |||
! Underwater | |||
|- | |||
| | |||
{{Catch/header|underwater|no}} | |||
{{Catch/entry3|366|Clamperl|no|no|yes|Dive|20-35|65%|type1=Water}} | |||
{{Catch/entry3|170|Chinchou|no|no|yes|Dive|20-30|30%|type1=Water|type2=Electric}} | |||
{{Catch/entry3|369|Relicanth|no|no|yes|Dive|30-35|5%|type1=Water|type2=Rock}} | |||
{{Catch/footer|underwater}} | |||
|} | |||
{| class="expandable" style="margin: auto; background: #{{locationcolor/med|ocean}}; {{roundy}}; border: 5px solid #{{locationcolor/light|ocean}};" | |||
|- align="center" | |||
! Route 124 | |||
|- | |||
| | |||
{{itlisth|ocean}} | |||
{{catch/div|ocean|Above water (requires {{mcolor|Surf|000}}, {{mcolor|Dive|000}})}} | |||
{{itemlist|Blue Shard|Shallow water, accessed by surfacing in the west-southwest Dive spot|E=yes}} | |||
{{itemlist|Yellow Shard|Shallow water, accessed by surfacing in the northeast Dive spot|E=yes}} | |||
{{itemlist|Red Shard|Shallow water, accessed by surfacing in the northwest Dive spot|E=yes}} | |||
{{catch/div|underwater|Underwater (requires {{mcolor|Surf|000}}, {{mcolor|Dive|000}})}} | |||
{{itemlist|Carbos|Clearing in the seaweed patch in the S-shaped trench (hidden)|E=yes}} | |||
{{itemlist|Calcium|In the dark spot directly beneath the north-central Dive spot (hidden)|E=yes}} | |||
{{itemlist|Heart Scale| | |||
* In the dark spot directly beneath the Dive spot nearest Mossdeep City (hidden) | |||
* Directly beneath the Dive spot near the route's center (hidden)|E=yes|display=[[Heart Scale]] ×2}} | |||
{{itemlist|Pearl|In the dark spot directly beneath the second Dive spot north-northwest of the Treasure Hunter's house (hidden)|E=yes|display={{i|Pearl}}}} | |||
{{itemlist|Big Pearl|In the dark spot directly beneath the larger Dive spot southwest of the Treasure Hunter's house (hidden)|E=yes}} | |||
{{itemlist|Green Shard|Beneath the smaller Dive spot near Lilycove City, in a clearing in the seaweed patch (hidden)|E=yes}} | |||
{{itlistfoot|ocean}} | |||
|} | |} | ||
===Abandoned Ship=== | |||
[[File:Abandoned Ship B1F and rooms RSE.png|thumb|left|Abandoned Ship, B1F]] | |||
[[File:Abandoned Ship UF RSE.png|thumb|Abandoned Ship, underwater hallway]] | |||
[[File:Abandoned Ship HF and rooms RSE.png|thumb|Abandoned Ship, hidden floor]] | |||
Now that you can use both {{m|Surf}} and {{m|Dive}}, you can navigate the sunken vessel's entire structure. | |||
{| class="expandable" style="margin: auto; background: #{{locationcolor/med|ocean}}; {{roundy}}; border: 5px solid #{{locationcolor/light|ocean}};" | |||
|- align="center" | |||
! Items | |||
|- | |||
| | |||
{{itlisth|ocean}} | |||
{{itemlist|Key to Room 1|Room 3, northeast corner (hidden)|E=yes|display=[[Key to Room 1|Rm. 1 Key]]}} | |||
{{itemlist|Water Stone|Room 3|E=yes}} | |||
{{itemlist|Key to Room 4|Room 1, near the west wall (hidden)|E=yes|display=[[Key to Room 4|Rm. 4 Key]]}} | |||
{{itemlist|TM Water|Room 1|E=yes|display={{TM|18|Rain Dance}}}} | |||
{{itemlist|Key to Room 6|Room 4, in the trash can (hidden)|E=yes|display=[[Key to Room 6|Rm. 6 Key]]}} | |||
{{itemlist|Luxury Ball|Room 6|E=yes|display={{ball|Luxury}}}} | |||
{{itemlist|Key to Room 2|Room 5, three step south of the left-hand trash can (hidden)|E=yes|display=[[Key to Room 2|Rm. 2 Key]]}} | |||
{{itemlist|Scanner|Room 2|E=yes}} | |||
{{itlistfoot|ocean}} | |||
|} | |||
====B1F==== | |||
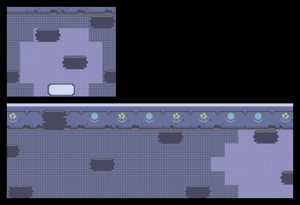
Head for the south-central cabin. Seawater has flooded into the room, so use {{m|Dive}} to traverse an underwater hallway that leads to an isolated part of the ship. | |||
====Hidden Floor==== | |||
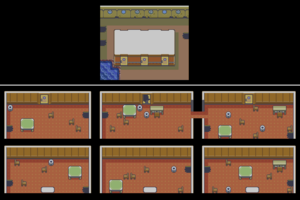
This part of the ship has six cabins. Rooms 1-3 are located on the south side, and Rooms 4-6 are found to the north. Four of these rooms are locked, and although Room 5 is unlocked, there is debris blocking the door. | |||
Enter Room 3 to see a sparkle on the floor; this signifies a hidden item. Pick up the [[Key to Room 1|Rm. 1 Key]] from the northeast corner, and the [[Water Stone]] to the left before leaving. | |||
[[ | |||
[[ | |||
There are two hidden items in Room 1. The [[Key to Room 4|Rm. 4 Key]] is located near the west wall, while the other item is just trash. The visible item is {{TM|18|Rain Dance}}. | |||
In Room 4, inspect the trash can in the northeast corner to find the [[Key to Room 1|Rm. 6 Key]]. | |||
{| | Enter Room 6 and collect the {{ball|Luxury}}, then use the narrow hallway to reach the adjoining room. Room 5 has three pieces of trash and one item; the [[Key to Room 1|Rm. 2 Key]] is located three steps south of the left-hand trash can. | ||
Visit Room 2 to find the [[Scanner]]. If you show this to the Scientist in the Captain's office, he asks you to take it to Captain Stern back in {{DL|Slateport City|Slateport Harbor}}. Once there, Stern offers to trade either a [[Deep Sea Tooth|DeepSeaTooth]] or a [[Deep Sea Scale|DeepSeaScale]] for it. The DeepSeaTooth doubles a {{p|Clamperl}}'s {{stat|Special Attack}} when held, and triggers Clamperl's evolution into {{p|Huntail}} when traded. The DeepSeaScale doubles a Clamperl's {{stat|Special Defense}} when held, and triggers its evolution into {{p|Gorebyss}} when traded. | |||
==Route 127== | |||
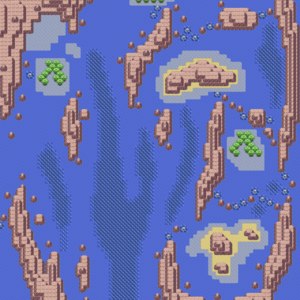
[[File:Hoenn Route 127 underwater E.png|thumb|left|Route 127, Underwater]] | |||
[[File:Hoenn Route 127 E.png|thumb|Route 127, Surface]] | |||
{{rt|127|Hoenn}} links [[Mossdeep City]] with {{rt|126|Hoenn}} to the west and {{rt|128|Hoenn}} to the south. Explore the area quickly on your way southward in pursuit of Team Aqua! | |||
{| class="expandable" style="margin: auto; background: #{{locationcolor/med|ocean}}; {{roundy}}; border: 5px solid #{{locationcolor/light|ocean}};" | |||
|- align="center" | |- align="center" | ||
! Trainers | ! Trainers | ||
|- | |- | ||
| | | | ||
{{trainerheader| | {{trainerheader|ocean}} | ||
{{trainerentry|Spr RS | {{trainerentry|Spr RS Bird Keeper.png|Bird Keeper|Aidan|1024<br><small>Potential [[Double Battle]] with Athena</small>|2|277|Swellow|♂|32||227|Skarmory|♂|32|}} | ||
{{trainerdiv| | {{trainerdiv|ocean}} | ||
{{trainerentry|Spr RS Cooltrainer F.png|Cooltrainer| | {{trainerentry|Spr RS Cooltrainer F.png|Cooltrainer|Athena|1536<br><small>Potential [[Double Battle]] with Aidan</small>|2|310|Manectric|♀|32||264|Linoone|♀|32|}} | ||
{{trainerdiv|ocean}} | |||
{{trainerentry|Spr RS Fisherman.png|Fisherman|Jonah|1280|3|320|Wailmer|♂|30||072|Tentacool|♂|31||319|Sharpedo|♂|32|}} | |||
{{trainerdiv| | {{trainerdiv|ocean}} | ||
{{trainerentry|Spr RS | {{trainerentry|Spr RS Fisherman.png|Fisherman|Roger|1400|3|129|Magikarp|♂|15||129|Magikarp|♂|25||130|Gyarados|♂|35|}} | ||
{{trainerdiv| | {{trainerdiv|ocean}} | ||
{{trainerentry|Spr RS | {{trainerentry|Spr RS Fisherman.png|Fisherman|Henry|1360|2|318|Carvanha|♂|31||073|Tentacruel|♂|34|}} | ||
{{trainerdiv| | {{trainerdiv|ocean}} | ||
{{trainerentry|Spr RS | {{trainerentry|Spr RS Triathlete Swimmer M.png|Triathlete|Camden|1320|2|120|Staryu||33||120|Staryu||33|}} | ||
{{trainerdiv| | {{trainerdiv|ocean}} | ||
{{trainerentry|Spr RS | {{trainerentry|Spr RS Black Belt.png|Black Belt|Koji|1088|1|067|Machoke|♂|34||38=Nav}} | ||
{{trainerentry|Spr RS | {{trainerdiv|ocean}} | ||
{{trainerdiv| | {{trainerentry|Spr RS Triathlete Swimmer F.png|Triathlete|Donny|1360|2|278|Wingull|♀|26||120|Staryu||34|}} | ||
{{trainerentry|Spr RS | {{catch/div|ocean|Rematch}} | ||
{{ | {{trainerentry|Spr RS Black Belt.png|Black Belt|Koji{{tt|*|First rematch}}|1184|2|067|Machoke|♂|37||067|Machoke|♂|37||38=Nav}} | ||
{{trainerentry|Spr RS | {{trainerentry|Spr RS Black Belt.png|Black Belt|Koji{{tt|*|Second rematch}}|1248|3|296|Makuhita|♂|39||067|Machoke|♂|39||067|Machoke|♂|39||38=Nav}} | ||
{{trainerentry|Spr RS Black Belt.png|Black Belt|Koji{{tt|*|Third rematch}}|1312|3|297|Hariyama|♂|41||067|Machoke|♂|41||067|Machoke|♂|41||38=Nav}} | |||
{{trainerentry|Spr RS | {{trainerentry|Spr RS Black Belt.png|Black Belt|Koji{{tt|*|Fourth rematch onwards}}|1376|3|297|Hariyama|♂|43||068|Machamp|♂|43||068|Machamp|♂|43||38=Nav}} | ||
{{trainerfooter|ocean|3}} | |||
{{trainerentry|Spr RS | |||
{{ | |||
{{trainerentry|Spr RS | |||
{{trainerfooter| | |||
|} | |} | ||
{| class="expandable | {| class="expandable" style="margin: auto; background: #{{locationcolor/med|ocean}}; {{roundy}}; border: 5px solid #{{locationcolor/light|ocean}};" | ||
|- align="center" | |- align="center" | ||
! Available Pokémon | ! Available Pokémon | ||
|- | |- | ||
| | |||
{{catch/header|ocean|no}} | |||
{{catch/div|ocean|Surfing}} | |||
{{catch/entry3|072|Tentacool|no|no|yes|Surf|5-35|60%|type1=Water|type2=Poison}} | |||
{{catch/entry3|278|Wingull|no|no|yes|Surf|10-30|35%|type1=Water|type2=Flying}} | |||
{{catch/entry3|279|Pelipper|no|no|yes|Surf|25-30|5%|type1=Water|type2=Flying}} | |||
{{catch/div|ocean|Fishing}} | |||
{{catch/entry3|129|Magikarp|no|no|yes|Fish Old|5-10|70%|type1=Water}} | |||
{{catch/entry3|072|Tentacool|no|no|yes|Fish Old|5-10|30%|type1=Water|type2=Poison}} | |||
{{catch/entry3|129|Magikarp|no|no|yes|Fish Good|10-30|60%|type1=Water}} | |||
{{catch/entry3|072|Tentacool|no|no|yes|Fish Good|10-30|20%|type1=Water|type2=Poison}} | |||
{{catch/entry3|320|Wailmer|no|no|yes|Fish Good|10-30|20%|type1=Water}} | |||
{{catch/entry3|320|Wailmer|no|no|yes|Fish Super|25-45|60%|type1=Water}} | |||
{{catch/entry3|319|Sharpedo|no|no|yes|Fish Super|30-35|40%|type1=Water|type2=Dark}} | |||
{{catch/footer|ocean}} | |||
|} | |||
{| class="expandable" style="margin: auto; background: #{{locationcolor/med|ocean}}; {{roundy}}; border: 5px solid #{{locationcolor/light|ocean}};" | |||
|- align="center" | |||
! Items | |||
|- | |||
| | | | ||
{{itlisth|ocean}} | |||
{{ | {{itemlist|Zinc|In the northwestern-most patch of shallow water|E=yes}} | ||
{{ | {{itemlist|Rare Candy|South side of the tree-covered northwest island|E=yes}} | ||
{{ | {{itemlist|Carbos|South end of the isolated grove, accessed via Dive spot near the southeast island|E=yes}} | ||
{{ | {{catch/div|underwater|Underwater}} | ||
{{ | {{itemlist|Star Piece|Main area's center-west branch, on a small rock (hidden)|E=yes}} | ||
{{ | {{itemlist|Heart Scale|Main area's center trench, on small rock to the south (hidden)|E=yes}} | ||
{{ | {{itemlist|HP Up|Main area's center-east branch, on a small rock (hidden)|E=yes}} | ||
{{ | {{itemlist|Red Shard|Isolated eastern trench, on a small rock (hidden)|E=yes}} | ||
{{ | {{itlistfoot|ocean}} | ||
{{ | |} | ||
==Route 128== | |||
[[File:Hoenn Route 128 RSE.png|thumb|250px|Route 128]] | |||
[[File:Hoenn Route 128 underwater RSE.png|thumb|250px|left|Route 128, Underwater]] | |||
' | {{rt|128|Hoenn}} is situated between {{rt|127|Hoenn}} to the north, {{rt|129|Hoenn}} to the south, and [[Ever Grande City]] to the east. [[Captain Stern]] mentioned that he'd found an underwater cave here while exploring in his [[Submarine Explorer 1|submarine]]. [[Team Aqua]] has now breached that same cavern with their stolen sub. | ||
{{Catch/header| | |||
{{Catch/entry3| | {| class="expandable" style="margin: auto; background: #{{locationcolor/med|ocean}}; {{roundy}}; border: 5px solid #{{locationcolor/light|ocean}};" | ||
{{Catch/entry3| | |- align="center" | ||
{{Catch/entry3| | ! Trainers | ||
{{Catch/entry3| | |- | ||
{{Catch/div| | | | ||
{{Catch/entry3|042|Golbat|no|no|yes|Surf| | {{trainerheader|ocean}} | ||
{{Catch/div| | {{trainerentry|Spr RS Cooltrainer M.png|Cooltrainer|Ruben|1632|2|275|Shiftry|♂|34||299|Nosepass|♂|34|}} | ||
{{trainerdiv|ocean}} | |||
{{trainerentry|Spr RS Cooltrainer F.png|Cooltrainer|Alexa|1632|2|044|Gloom|♀|34||184|Azumarill|♀|34|}} | |||
{{trainerdiv|ocean}} | |||
{{trainerentry|Spr RS Fisherman.png|Fisherman|Wayne|1440|3|072|Tentacool|♂|31||072|Tentacool|♂|31||320|Wailmer|♂|36|}} | |||
{{trainerdiv|ocean}} | |||
{{trainerentry|Spr RS Triathlete Swimmer M.png|Triathlete|Isaiah|1400|1|120|Staryu||35||38=Nav}} | |||
{{trainerdiv|ocean}} | |||
{{trainerentry|Spr RS Triathlete Swimmer F.png|Triathlete|Katelyn|1400|1|120|Staryu||35||38=Nav}} | |||
{{trainerdiv|ocean}} | |||
{{trainerentry|Spr RS Swimmer F.png|Swimmer|Carlee|280<br><small>Potential [[Double Battle]] with Harrison</small>|1|119|Seaking|♀|35|}} | |||
{{trainerdiv|ocean}} | |||
{{trainerentry|Spr RS Swimmer M.png|Swimmer|Harrison|280<br><small>Potential [[Double Battle]] with Carlee</small>|1|073|Tentacruel|♂|35|}} | |||
{{catch/div|ocean|Rematch}} | |||
{{trainerentry|Spr RS Triathlete Swimmer M.png|Triathlete|Isaiah{{tt|*|First and second rematch}}|{{tt|1560|First rematch}}/{{tt|1680|Second rematch}}|1|120|Staryu||{{tt|39|First rematch}}/{{tt|42|Second rematch}}||38=Nav}} | |||
{{trainerentry|Spr RS Triathlete Swimmer M.png|Triathlete|Isaiah{{tt|*|Third and fourth rematch onwards}}|{{tt|1800|Third rematch}}/{{tt|1920|Fourth rematch onwards}}|1|121|Starmie||{{tt|45|Third rematch}}/{{tt|48|Fourth rematch onwards}}||38=Nav}} | |||
{{trainerdiv|ocean}} | |||
{{trainerentry|Spr RS Triathlete Swimmer F.png|Triathlete|Katelyn{{tt|*|First and second rematch}}|{{tt|1560|First rematch}}/{{tt|1680|Second rematch}}|1|120|Staryu||{{tt|39|First rematch}}/{{tt|42|Second rematch}}||38=Nav}} | |||
{{trainerentry|Spr RS Triathlete Swimmer F.png|Triathlete|Katelyn{{tt|*|Third and fourth rematch onwards}}|{{tt|1800|Third rematch}}/{{tt|1920|Fourth rematch onwards}}|1|121|Starmie||{{tt|45|Third rematch}}/{{tt|48|Fourth rematch onwards}}||38=Nav}} | |||
{{trainerfooter|ocean|3}} | |||
|} | |||
{| class="expandable" style="margin: auto; background: #{{locationcolor/med|ocean}}; {{roundy}}; border: 5px solid #{{locationcolor/light|ocean}};" | |||
|- align="center" | |||
! Available Pokémon | |||
|- | |||
| | |||
{{Catch/header|ocean|no}} | |||
{{Catch/div|ocean|Surfing}} | |||
{{catch/entry3|072|Tentacool|no|no|yes|Surf|5-35|60%|type1=Water|type2=Poison}} | |||
{{catch/entry3|278|Wingull|no|no|yes|Surf|10-30|35%|type1=Water|type2=Flying}} | |||
{{catch/entry3|279|Pelipper|no|no|yes|Surf|25-30|5%|type1=Water|type2=Flying}} | |||
{{Catch/div|ocean|Fishing}} | |||
{{catch/entry3|129|Magikarp|no|no|yes|Fish Old|5-10|70%|type1=Water}} | |||
{{catch/entry3|072|Tentacool|no|no|yes|Fish Old|5-10|30%|type1=Water|type2=Poison}} | |||
{{catch/entry3|129|Magikarp|no|no|yes|Fish Good|10-30|60%|type1=Water}} | |||
{{catch/entry3|320|Wailmer|no|no|yes|Fish Good|10-30|20%|type1=Water}} | |||
{{catch/entry3|370|Luvdisc|no|no|yes|Fish Good|10-30|20%|type1=Water}} | |||
{{catch/entry3|320|Wailmer|no|no|yes|Fish Super|30-45|45%|type1=Water}} | |||
{{catch/entry3|370|Luvdisc|no|no|yes|Fish Super|30-35|40%|type1=Water}} | |||
{{catch/entry3|222|Corsola|no|no|yes|Fish Super|30-35|15%|type1=Water|type2=Rock}} | |||
{{Catch/footer|ocean}} | |||
|} | |||
{| class="expandable" style="margin: auto; background: #{{locationcolor/med|ocean}}; {{roundy}}; border: 5px solid #{{locationcolor/light|ocean}};" | |||
|- align="center" | |||
! Items | |||
|- | |||
| | |||
{{itlisth|ocean}} | |||
{{itemlist|Heart Scale| | |||
* In the north-central sandbar, two steps east of Cooltrainer Ruben (hidden) | |||
* On the sandbar to the east of the sand ring (hidden) | |||
* On the south side of the southwest sandbar (hidden)|E=yes|display=[[Heart Scale]] ×3}} | |||
{{catch/div|underwater|Underwater}} | |||
{{itemlist|Protein|Main area, on a small rock in the middle of the rocky ring (hidden)|E=yes}} | |||
{{itemlist|Pearl|Eastern area, on a small rock (hidden)|E=yes|display={{OBP|Pearl}}}} | |||
{{itlistfoot|ocean}} | |||
|} | |||
==Seafloor Cavern== | |||
[[File:Seafloor Cavern entrance E.png|thumb|left|Seafloor Cavern, Entrance]] | |||
[[File:Seafloor Cavern R1 E.png|thumb|Seafloor Cavern, Room 1]] | |||
[[File:Seafloor Cavern R2 E.png|thumb|left|Seafloor Cavern, Room 2]] | |||
[[File:Seafloor Cavern R3 E.png|thumb|Seafloor Cavern, Room 3]] | |||
[[File:Seafloor Cavern R4 E.png|thumb|left|Seafloor Cavern, Room 4]] | |||
[[File:Seafloor Cavern R5 E.png|thumb|Seafloor Cavern, Room 5]] | |||
[[File:Seafloor Cavern R6 E.png|thumb|left|Seafloor Cavern, Room 6]] | |||
[[File:Seafloor Cavern R7 E.png|thumb|Seafloor Cavern, Room 7]] | |||
[[File:Seafloor Cavern end E.png|thumb|Seafloor Cavern, Deepest Room]] | |||
The long-forgotten [[Seafloor Cavern]] can only be reached from an underwater cave in the depths of {{rt|128|Hoenn}}. [[Archie]] has gone to great lengths to breach the seal that has protected this place for ages, in the hope of awakening the super-ancient Pokémon rumored to dwell here. He believes this Pokémon has the power to bring about the great future he desires, but the risks seem far too great. | |||
{| class="expandable" style="margin: auto; background: #{{locationcolor/med|underwater}}; {{roundy}}; border: 5px solid #{{locationcolor/light|underwater}};" | |||
|- align="center" | |||
! Trainers | |||
|- | |||
| | |||
{{trainerheader|underwater}} | |||
{{trainerentry|Spr RS Team Aqua Grunt M.png|Team Aqua Grunt||720|1|261|Poochyena|♂|36|}} | |||
{{trainerdiv|underwater}} | |||
{{trainerentry|Spr RS Team Aqua Grunt M.png|Team Aqua Grunt||720|1|318|Carvanha|♂|36|}} | |||
{{trainerdiv|underwater}} | |||
{{trainerentry|Spr RS Team Aqua Grunt M.png|Team Aqua Grunt||720<br/><small>Potential [[Double Battle]] with the following Grunt</small>|1|041|Zubat|♂|36}} | |||
{{trainerdiv|underwater}} | |||
{{trainerentry|Spr RS Team Aqua Grunt F.png|Team Aqua Grunt||720<br/><small>Potential [[Double Battle]] with the previous Grunt</small>|1|318|Carvanha|♀|36}} | |||
{{trainerdiv|underwater}} | |||
{{trainerentry|Spr RS Team Aqua Grunt M.png|Team Aqua Grunt||700<br/><small>Potential [[Double Battle]] with Aqua Admin Shelly</small>|2|262|Mightyena|♂|35||042|Golbat|♂|35|}} | |||
{{trainerfooter|underwater|I}} | |||
|} | |||
{| class="expandable" style="margin: auto; background: #{{locationcolor/med|underwater}}; {{roundy}}; border: 5px solid #{{locationcolor/light|underwater}};" | |||
|- align="center" | |||
! Available Pokémon | |||
|- | |||
| | |||
{{Catch/header|underwater|no}} | |||
{{Catch/entry3|041|Zubat|no|no|yes|Cave|28-35|90%|type1=Poison|type2=Flying}} | |||
{{Catch/entry3|042|Golbat|no|no|yes|Cave|33-36|10%|type1=Poison|type2=Flying}} | |||
{{Catch/div|underwater|Surfing}} | |||
{{Catch/entry3|072|Tentacool|no|no|yes|Surf|5-35|60%|type1=Water|type2=Poison}} | |||
{{Catch/entry3|041|Zubat|no|no|yes|Surf|5-35|35%|type1=Poison|type2=Flying}} | |||
{{Catch/entry3|042|Golbat|no|no|yes|Surf|30-35|5%|type1=Poison|type2=Flying}} | |||
{{Catch/div|underwater|Fishing}} | |||
{{Catch/entry3|129|Magikarp|no|no|yes|Fish Old|5-10|70%|type1=Water}} | {{Catch/entry3|129|Magikarp|no|no|yes|Fish Old|5-10|70%|type1=Water}} | ||
{{Catch/entry3| | {{Catch/entry3|072|Tentacool|no|no|yes|Fish Old|5-10|30%|type1=Water|type2=Poison}} | ||
{{Catch/entry3|129|Magikarp|no|no|yes|Fish Good|10-30|60%|type1=Water}} | {{Catch/entry3|129|Magikarp|no|no|yes|Fish Good|10-30|60%|type1=Water}} | ||
{{Catch/entry3| | {{Catch/entry3|072|Tentacool|no|no|yes|Fish Good|10-30|20%|type1=Water|type2=Poison}} | ||
{{Catch/entry3| | {{Catch/entry3|320|Wailmer|no|no|yes|Fish Good|10-30|20%|type1=Water}} | ||
{{Catch/entry3| | {{Catch/entry3|320|Wailmer|no|no|yes|Fish Super|20-45|100%|type1=Water}} | ||
{{Catch/footer|underwater|3}} | |||
{{Catch/footer| | |||
|} | |} | ||
{| class="expandable | {| class="expandable" style="margin: auto; background: #{{locationcolor/med|underwater}}; {{roundy}}; border: 5px solid #{{locationcolor/light|underwater}};" | ||
|- align="center" | |- align="center" | ||
! Items | ! Items | ||
|- | |- | ||
| | | | ||
{{ | {{itlisth|underwater}} | ||
{{ | {{itemlist|TM Ground|Deepest Room, east of the doorway|E=yes|display={{TM|26|Earthquake}}}} | ||
{{itlistfoot|underwater}} | |||
{{ | |||
|} | |} | ||
===Entrance=== | |||
When you first enter the cavern, you find [[Captain Stern]]'s sub moored beneath the waves. Rise to the surface and take the north doorway to the next room. | |||
===Room 1=== | |||
This room features two boulders that hinder travel. Go northwest and clear the way with {{m|Rock Smash}}, then use {{m|Strength}} to move the first boulder southward. Head east and move the second boulder eastward. At this point, there are two paths forward. The northwest doorway leads directly to the southeast part of Room 4. The southeast doorway leads through Rooms 2 and 3 to the southwest part of Room 4. | |||
===Room 2=== | |||
Head south to a fork in the road. Both tunnels lead into the next room, but the western tunnel serves as a shortcut. | |||
===Room 3=== | |||
The doorway to the south merely leads back to the entrance. Instead, go through the northeast doorway. | |||
===Room 4=== | |||
Use {{m|Strength}} or {{m|Rock Smash}} to clear a path, then move the west-central boulder to the northwest corner. The northwest doorway leads to Room 5, while the northeast doorway leads to Room 6. | |||
===Room 5=== | |||
This room has many strong water currents. {{m|Surf}} out into the water and ride the currents to a calm spot a short distance to the northeast. Sail east to ride the current to a patch of calm water to the northeast. Go east again to follow the current around the rock outcropping to the west side of the room. Surf westward and take the current to the northwest doorway. | |||
===Room 6=== | |||
This room has many strong water currents. Surf eastward along the south wall to the second current, which leads a short distance northward. Go north from here to reach the west side of the room. Sail north once more to follow the current back and forth on the room's north side. Climb onto shore and go through the northwest doorway. | |||
===Room 7=== | |||
The room splits into two tunnels before converging near the next doorway. The room's east side is littered with boulders, while the west side is clear, aside from [[Shelly]] and an Aqua Grunt. She's looking for payback for what happened in the [[Weather Institute]], and draws you into battle! | |||
====VS Shelly==== | |||
{| style="margin: auto;" | |||
| | |||
{{Party/Single | |||
|color={{sapphire color light}}|headcolor={{water color}}|bordercolor={{sapphire color}} | |||
|sprite=Spr RS Shelly.png | |||
|prize={{PDollar}}1480 | |||
|class=Aqua Admin|name={{color2|000|Shelly}} | |||
|game=E|location=Seafloor Cavern | |||
|pokemon=2}} | |||
|{{Pokémon/3|game=Emerald | |||
|ndex=319|pokemon=Sharpedo | |||
|type1=Water|type2=Dark | |||
|level=37|gender=female | |||
|ability=Rough Skin | |||
|move1=Scary Face|move1type=Normal | |||
|move2=Crunch|move2type=Dark | |||
|move3=Screech|move3type=Normal | |||
|move4=Slash|move4type=Normal}} | |||
|{{Pokémon/3|game=Emerald | |||
|ndex=262|pokemon=Mightyena | |||
|type1=Dark | |||
|level=37|gender=female | |||
|ability=Intimidate | |||
|move1=Roar|move1type=Normal | |||
|move2=Swagger|move2type=Normal | |||
|move3=Scary Face|move3type=Normal | |||
|move4=Take Down|move4type=Normal}} | |||
|{{Pokémon/3 | |||
|game= | |||
|ndex= | |||
|pokemon= | |||
| | |||
|level= | |||
|gender=female | |||
|ability= | |||
|move1= | |||
|move1type=Normal | |||
|move2= | |||
|move2type=Normal | |||
|move3= | |||
|move3type=Normal | |||
|move4= | |||
|move4type | |||
{{Party/Footer}} | {{Party/Footer}} | ||
|} | |} | ||
===Room 8=== | |||
There are a dozen boulders here to block progress. Start off by moving the south-central boulder one step northward and the other two southern-most boulders farther apart. Push the first boulder one step westward, then shove the middle boulder one step northward. Move the boulders on the left and right farther apart, then push both the north-northwest and north-northeast boulders to the north wall. Finally, push the middle boulder to either side to reach the doorway. | |||
===Deepest Room=== | |||
Go east to find {{TM|26|Earthquake}} on the room's highest level before continuing along the downward-sloping corridor. [[Team Aqua]]'s driven leader, [[Archie]] suddenly runs up to you. Like [[Maxie]] did with {{p|Groudon}}, Archie has discovered the super-ancient Pokémon, {{p|Kyogre}}, and stands ready to restore the creature with his stolen [[Red Orb]]. With his plan so close to fruition, he's not about to let anything stop him, and drags you into battle. | |||
=== | ====VS Archie==== | ||
{| style="margin: auto;" | |||
| | |||
{{Party/Single | |||
|color={{sapphire color light}}|headcolor={{water color}}|bordercolor={{sapphire color}} | |||
|sprite=Spr RS Archie.png | |||
|prize={{PDollar}}3440 | |||
|class=Aqua Leader|classlink=Archie|name={{color2|000|Archie}} | |||
|game=E|location=Seafloor Cavern | |||
|pokemon=3}} | |||
== | |{{Pokémon/3|game=Emerald | ||
|ndex=262|pokemon=Mightyena | |||
|type1=Dark | |||
|level=41|gender=male | |||
|ability=Intimidate | |||
|move1=Roar|move1type=Normal | |||
|move2=Swagger|move2type=Normal | |||
|move3=Scary Face|move3type=Normal | |||
|move4=Take Down|move4type=Normal}} | |||
|{{Pokémon/3|game=Emerald | |||
|ndex=169|pokemon=Crobat | |||
|type1=Poison|type2=Flying | |||
|level=41|gender=male | |||
|ability=Inner Focus | |||
|move1=Bite|move1type=Dark | |||
|move2=Wing Attack|move2type=Flying | |||
|move3=Confuse Ray|move3type=Ghost | |||
|move4=Air Cutter|move4type=Flying}} | |||
|{{Pokémon/3|game=Emerald | |||
|ndex=319|pokemon=Sharpedo | |||
|type1=Water|type2=Dark | |||
|level=43|gender=male | |||
|ability=Rough Skin | |||
|move1=Screech|move1type=Normal | |||
|move2=Slash|move2type=Normal | |||
|move3=Taunt|move3type=Dark | |||
|move4=Swagger|move4type=Normal}} | |||
{{Party/Footer}} | |||
|} | |||
Even defeated, Archie reaffirms his intent to revive the super-ancient Pokémon. While talking, the [[Red Orb]] suddenly shines brightly, awakening {{p|Kyogre}}. Like {{p|Groudon}} before it, the Pokémon flees. Just then, Archie receives an urgent call from his subordinates outside. The great energy generated by the legendary creature has altered and intensified [[Hoenn]]'s weather as expected, but to dangerous, unforeseen levels. The weather's dramatic shift to a strange mix of heavy rain and harsh sunlight influences any battles on the region's east side. [[Maxie]] and a pair of his Grunts enter a moment later. He condemns [[Team Aqua]]'s actions and tries to reason with Archie, who counters by criticizing [[Team Magma]] for disturbing Groudon. | |||
==Route 128== | |||
The group returns to the surface, where they witness the extreme weather firsthand. Kyogre's power has surpassed expectations, forcing Archie to grudgingly agree to work with Maxie to set things right. Once the others leave, {{steven}} swoops down to assess the situation. He informs you that the oppressive weather seems to originate in [[Sootopolis City]] to the northwest. He's headed there to investigate, and suggests you do the same. | |||
{{WalkthroughPrevNext | | {{WalkthroughPrevNext | ||
game=Emerald | |game=Emerald | ||
|gamename=Emerald | |||
gamename=Emerald | |prevsection=14 | ||
|prevname=Route 124, Mossdeep City, Route 125 | |||
|nextsection=16 | |||
prevsection= 14 | | |nextname=Route 126, Sootopolis City, Cave of Origin, Route 129, Route 130, Route 131, Pacifidlog Town | ||
nextsection= 16 | | |||
}} | }} | ||
<br> | |||
{{Project Walkthroughs notice}} | {{Project Walkthroughs notice}} | ||
[[Category:Emerald walkthrough]] | [[Category:Emerald walkthrough]] | ||
Revision as of 23:55, 15 September 2019
Shoal Cave (optional)
Connected to the ocean, the appearance of Shoal Cave changes with the tides. Seawater floods the cave during high tide, closing off some areas and opening others. It then drains away during low tide, revealing new areas for exploration. The tides change every six hours, at 3:00 and 9:00.
| Available Pokémon | ||||||||||||||||||||||||||||||||||||||||||||||||||||||||||||||||||||||||||||||||||||||||||||||||||||||||||||||||||||||||||||||||||||||||||||||||||||||||||||||||||||||||||||||||||||||||||||||||||||||||||||||||||||||||||||||||||||||||||||||||||||||||||||||||||||||||||||||||||||||||||||||||||||||||||||||||||||||||||||||||||||||||||||||||||||||
|---|---|---|---|---|---|---|---|---|---|---|---|---|---|---|---|---|---|---|---|---|---|---|---|---|---|---|---|---|---|---|---|---|---|---|---|---|---|---|---|---|---|---|---|---|---|---|---|---|---|---|---|---|---|---|---|---|---|---|---|---|---|---|---|---|---|---|---|---|---|---|---|---|---|---|---|---|---|---|---|---|---|---|---|---|---|---|---|---|---|---|---|---|---|---|---|---|---|---|---|---|---|---|---|---|---|---|---|---|---|---|---|---|---|---|---|---|---|---|---|---|---|---|---|---|---|---|---|---|---|---|---|---|---|---|---|---|---|---|---|---|---|---|---|---|---|---|---|---|---|---|---|---|---|---|---|---|---|---|---|---|---|---|---|---|---|---|---|---|---|---|---|---|---|---|---|---|---|---|---|---|---|---|---|---|---|---|---|---|---|---|---|---|---|---|---|---|---|---|---|---|---|---|---|---|---|---|---|---|---|---|---|---|---|---|---|---|---|---|---|---|---|---|---|---|---|---|---|---|---|---|---|---|---|---|---|---|---|---|---|---|---|---|---|---|---|---|---|---|---|---|---|---|---|---|---|---|---|---|---|---|---|---|---|---|---|---|---|---|---|---|---|---|---|---|---|---|---|---|---|---|---|---|---|---|---|---|---|---|---|---|---|---|---|---|---|---|---|---|---|---|---|---|---|---|---|---|---|---|---|---|---|---|---|---|---|---|---|---|---|---|---|---|---|---|---|---|---|---|---|---|---|---|---|---|---|---|---|---|---|---|---|---|
| ||||||||||||||||||||||||||||||||||||||||||||||||||||||||||||||||||||||||||||||||||||||||||||||||||||||||||||||||||||||||||||||||||||||||||||||||||||||||||||||||||||||||||||||||||||||||||||||||||||||||||||||||||||||||||||||||||||||||||||||||||||||||||||||||||||||||||||||||||||||||||||||||||||||||||||||||||||||||||||||||||||||||||||||||||||||
| Items | |||||||||||||||||||||||||||||||||||||||||||||||||||||||||||||||||||||||||||||||||||||||||
|---|---|---|---|---|---|---|---|---|---|---|---|---|---|---|---|---|---|---|---|---|---|---|---|---|---|---|---|---|---|---|---|---|---|---|---|---|---|---|---|---|---|---|---|---|---|---|---|---|---|---|---|---|---|---|---|---|---|---|---|---|---|---|---|---|---|---|---|---|---|---|---|---|---|---|---|---|---|---|---|---|---|---|---|---|---|---|---|---|---|
| |||||||||||||||||||||||||||||||||||||||||||||||||||||||||||||||||||||||||||||||||||||||||
High tide
Entrance
An old man in the entry chamber offers to make a Shell Bell for your Pokémon. But first, he needs you to collect some of the cave's natural resources: Shoal Shells and Shoal Salts. These items are replenished each day, so there's no limit to the number you can collect. Once you hand over four of each item, he crafts the health-restoring item for you. Surf northwest and take the doorway there to reach the next chamber.
Second Cavern
Surf along the water in a clockwise direction, collecting the four Shoal Shells and a Rare Candy on the way. Take the southeast doorway back to the entrance, where you can collect a Big Pearl on the nearby ledge.
Low tide
Entrance
An old man in the entry chamber offers to make a Shell Bell for your Pokémon. But first, he needs you to collect some of the cave's natural resources: Shoal Shells and Shoal Salts. These items are replenished each day, so there's no limit to the number you can collect. Once you hand over four of each item, he crafts the health-restoring item for you. Head through the north doorway to reach the next chamber.
Second Cavern
Head up the stairway, go north and climb down the east-central ladder.
Fourth Cavern
Grab the Shoal Salt and Ice Heal, then climb the hill to the ladder in the northwest.
Second Cavern
Go west then south along the two bridges, then climb down the ladder in the center.
Third Cavern
Head east to meet a Black Belt and receive a Focus Band from him. Continue east to find another Shoal Salt, then use Strength to move the boulder eastward and descend the ladder to the south.
Ice Cavern
The final cavern is permanently encased in ice, and the slick floors hinder travel. Go south from the ladder, across two ice patches. At the third ice patch, slide west to the second snow patch within it. Slide north, then west and south to the third small snow patch. Slide south, east, then north to continue on. Slide north to the snow patch near the narrow stairway. Move west then south to a rock, then east and north to the central plateau and the NeverMeltIce on its south end. Slide south from the narrow stairway, then west and north to reach the northwest corner. Go east then south to a snow patch, then north to a rock near the room's northwest corner. Head east, south, and west, then move north, west, south, and west to the small snow patch. Slide north, east, then south to reach TM07 (Hail) and jump the ledge to return to the ladder.
Now that you can use Dive (optional)
There are many underwater treasures (as well as three underwater Pokémon) beneath the Abandoned Ship and Route 124 you can collect. All underwater areas with seaweed have the same wild Pokémon.
| Underwater | ||||||||||||||||||||||||||||||||||||||||||||||||||||||||||||||||||||||||||
|---|---|---|---|---|---|---|---|---|---|---|---|---|---|---|---|---|---|---|---|---|---|---|---|---|---|---|---|---|---|---|---|---|---|---|---|---|---|---|---|---|---|---|---|---|---|---|---|---|---|---|---|---|---|---|---|---|---|---|---|---|---|---|---|---|---|---|---|---|---|---|---|---|---|---|
| ||||||||||||||||||||||||||||||||||||||||||||||||||||||||||||||||||||||||||
| Route 124 | ||||||||||||||||||||||||||||||||||||||||||||||||||||||||||||||||||||||||||
|---|---|---|---|---|---|---|---|---|---|---|---|---|---|---|---|---|---|---|---|---|---|---|---|---|---|---|---|---|---|---|---|---|---|---|---|---|---|---|---|---|---|---|---|---|---|---|---|---|---|---|---|---|---|---|---|---|---|---|---|---|---|---|---|---|---|---|---|---|---|---|---|---|---|---|
| ||||||||||||||||||||||||||||||||||||||||||||||||||||||||||||||||||||||||||
Abandoned Ship
Now that you can use both Surf and Dive, you can navigate the sunken vessel's entire structure.
| Items | ||||||||||||||||||||||||||||||||||||||||
|---|---|---|---|---|---|---|---|---|---|---|---|---|---|---|---|---|---|---|---|---|---|---|---|---|---|---|---|---|---|---|---|---|---|---|---|---|---|---|---|---|
| ||||||||||||||||||||||||||||||||||||||||
B1F
Head for the south-central cabin. Seawater has flooded into the room, so use Dive to traverse an underwater hallway that leads to an isolated part of the ship.
Hidden Floor
This part of the ship has six cabins. Rooms 1-3 are located on the south side, and Rooms 4-6 are found to the north. Four of these rooms are locked, and although Room 5 is unlocked, there is debris blocking the door.
Enter Room 3 to see a sparkle on the floor; this signifies a hidden item. Pick up the Rm. 1 Key from the northeast corner, and the Water Stone to the left before leaving.
There are two hidden items in Room 1. The Rm. 4 Key is located near the west wall, while the other item is just trash. The visible item is TM18 (Rain Dance).
In Room 4, inspect the trash can in the northeast corner to find the Rm. 6 Key.
Enter Room 6 and collect the Luxury Ball, then use the narrow hallway to reach the adjoining room. Room 5 has three pieces of trash and one item; the Rm. 2 Key is located three steps south of the left-hand trash can.
Visit Room 2 to find the Scanner. If you show this to the Scientist in the Captain's office, he asks you to take it to Captain Stern back in Slateport Harbor. Once there, Stern offers to trade either a DeepSeaTooth or a DeepSeaScale for it. The DeepSeaTooth doubles a Clamperl's Special Attack when held, and triggers Clamperl's evolution into Huntail when traded. The DeepSeaScale doubles a Clamperl's Special Defense when held, and triggers its evolution into Gorebyss when traded.
Route 127
Route 127 links Mossdeep City with Route 126 to the west and Route 128 to the south. Explore the area quickly on your way southward in pursuit of Team Aqua!
| Trainers | |||||||||||||||||||||||||||||||||||||||||||||||||||||||||||||||||||||||||||||||||||||||||||||||||||||||||||||||||||||||||||||||||||||||||||||||||||||||||||||||||||||||||||||||||||||||||||||||||||||||||||||||||||||||||||||||||||||||||||||||||||||||||||||||||||||||||||||||||||||||||||||
|---|---|---|---|---|---|---|---|---|---|---|---|---|---|---|---|---|---|---|---|---|---|---|---|---|---|---|---|---|---|---|---|---|---|---|---|---|---|---|---|---|---|---|---|---|---|---|---|---|---|---|---|---|---|---|---|---|---|---|---|---|---|---|---|---|---|---|---|---|---|---|---|---|---|---|---|---|---|---|---|---|---|---|---|---|---|---|---|---|---|---|---|---|---|---|---|---|---|---|---|---|---|---|---|---|---|---|---|---|---|---|---|---|---|---|---|---|---|---|---|---|---|---|---|---|---|---|---|---|---|---|---|---|---|---|---|---|---|---|---|---|---|---|---|---|---|---|---|---|---|---|---|---|---|---|---|---|---|---|---|---|---|---|---|---|---|---|---|---|---|---|---|---|---|---|---|---|---|---|---|---|---|---|---|---|---|---|---|---|---|---|---|---|---|---|---|---|---|---|---|---|---|---|---|---|---|---|---|---|---|---|---|---|---|---|---|---|---|---|---|---|---|---|---|---|---|---|---|---|---|---|---|---|---|---|---|---|---|---|---|---|---|---|---|---|---|---|---|---|---|---|---|---|---|---|---|---|---|---|---|---|---|---|---|---|---|---|---|---|---|---|---|---|---|---|---|---|---|---|---|---|---|---|---|---|---|
| |||||||||||||||||||||||||||||||||||||||||||||||||||||||||||||||||||||||||||||||||||||||||||||||||||||||||||||||||||||||||||||||||||||||||||||||||||||||||||||||||||||||||||||||||||||||||||||||||||||||||||||||||||||||||||||||||||||||||||||||||||||||||||||||||||||||||||||||||||||||||||||
| Available Pokémon | ||||||||||||||||||||||||||||||||||||||||||||||||||||||||||||||||||||||||||||||||||||||||||||||||||||||||||||||||||||||||||||||||||||||||||||||||||||||||||||||||||||||||||||||||||||||||||||||||||||||||||||||||||||||||
|---|---|---|---|---|---|---|---|---|---|---|---|---|---|---|---|---|---|---|---|---|---|---|---|---|---|---|---|---|---|---|---|---|---|---|---|---|---|---|---|---|---|---|---|---|---|---|---|---|---|---|---|---|---|---|---|---|---|---|---|---|---|---|---|---|---|---|---|---|---|---|---|---|---|---|---|---|---|---|---|---|---|---|---|---|---|---|---|---|---|---|---|---|---|---|---|---|---|---|---|---|---|---|---|---|---|---|---|---|---|---|---|---|---|---|---|---|---|---|---|---|---|---|---|---|---|---|---|---|---|---|---|---|---|---|---|---|---|---|---|---|---|---|---|---|---|---|---|---|---|---|---|---|---|---|---|---|---|---|---|---|---|---|---|---|---|---|---|---|---|---|---|---|---|---|---|---|---|---|---|---|---|---|---|---|---|---|---|---|---|---|---|---|---|---|---|---|---|---|---|---|---|---|---|---|---|---|---|---|---|---|---|---|---|---|---|---|
| ||||||||||||||||||||||||||||||||||||||||||||||||||||||||||||||||||||||||||||||||||||||||||||||||||||||||||||||||||||||||||||||||||||||||||||||||||||||||||||||||||||||||||||||||||||||||||||||||||||||||||||||||||||||||
| Items | |||||||||||||||||||||||||||||||||||||||||||||||||||
|---|---|---|---|---|---|---|---|---|---|---|---|---|---|---|---|---|---|---|---|---|---|---|---|---|---|---|---|---|---|---|---|---|---|---|---|---|---|---|---|---|---|---|---|---|---|---|---|---|---|---|---|
| |||||||||||||||||||||||||||||||||||||||||||||||||||
Route 128
Route 128 is situated between Route 127 to the north, Route 129 to the south, and Ever Grande City to the east. Captain Stern mentioned that he'd found an underwater cave here while exploring in his submarine. Team Aqua has now breached that same cavern with their stolen sub.
| Trainers | ||||||||||||||||||||||||||||||||||||||||||||||||||||||||||||||||||||||||||||||||||||||||||||||||||||||||||||||||||||||||||||||||||||||||||||||||||||||||||||||||||||||||||||||||||||||||||||||||||||||||
|---|---|---|---|---|---|---|---|---|---|---|---|---|---|---|---|---|---|---|---|---|---|---|---|---|---|---|---|---|---|---|---|---|---|---|---|---|---|---|---|---|---|---|---|---|---|---|---|---|---|---|---|---|---|---|---|---|---|---|---|---|---|---|---|---|---|---|---|---|---|---|---|---|---|---|---|---|---|---|---|---|---|---|---|---|---|---|---|---|---|---|---|---|---|---|---|---|---|---|---|---|---|---|---|---|---|---|---|---|---|---|---|---|---|---|---|---|---|---|---|---|---|---|---|---|---|---|---|---|---|---|---|---|---|---|---|---|---|---|---|---|---|---|---|---|---|---|---|---|---|---|---|---|---|---|---|---|---|---|---|---|---|---|---|---|---|---|---|---|---|---|---|---|---|---|---|---|---|---|---|---|---|---|---|---|---|---|---|---|---|---|---|---|---|---|---|---|---|---|---|---|
| ||||||||||||||||||||||||||||||||||||||||||||||||||||||||||||||||||||||||||||||||||||||||||||||||||||||||||||||||||||||||||||||||||||||||||||||||||||||||||||||||||||||||||||||||||||||||||||||||||||||||
| Available Pokémon | ||||||||||||||||||||||||||||||||||||||||||||||||||||||||||||||||||||||||||||||||||||||||||||||||||||||||||||||||||||||||||||||||||||||||||||||||||||||||||||||||||||||||||||||||||||||||||||||||||||||||||||||||||||||||||||||||||||||||
|---|---|---|---|---|---|---|---|---|---|---|---|---|---|---|---|---|---|---|---|---|---|---|---|---|---|---|---|---|---|---|---|---|---|---|---|---|---|---|---|---|---|---|---|---|---|---|---|---|---|---|---|---|---|---|---|---|---|---|---|---|---|---|---|---|---|---|---|---|---|---|---|---|---|---|---|---|---|---|---|---|---|---|---|---|---|---|---|---|---|---|---|---|---|---|---|---|---|---|---|---|---|---|---|---|---|---|---|---|---|---|---|---|---|---|---|---|---|---|---|---|---|---|---|---|---|---|---|---|---|---|---|---|---|---|---|---|---|---|---|---|---|---|---|---|---|---|---|---|---|---|---|---|---|---|---|---|---|---|---|---|---|---|---|---|---|---|---|---|---|---|---|---|---|---|---|---|---|---|---|---|---|---|---|---|---|---|---|---|---|---|---|---|---|---|---|---|---|---|---|---|---|---|---|---|---|---|---|---|---|---|---|---|---|---|---|---|---|---|---|---|---|---|---|---|---|---|---|---|---|---|---|---|
| ||||||||||||||||||||||||||||||||||||||||||||||||||||||||||||||||||||||||||||||||||||||||||||||||||||||||||||||||||||||||||||||||||||||||||||||||||||||||||||||||||||||||||||||||||||||||||||||||||||||||||||||||||||||||||||||||||||||||
| Items | |||||||||||||||||||||||||||||||||||
|---|---|---|---|---|---|---|---|---|---|---|---|---|---|---|---|---|---|---|---|---|---|---|---|---|---|---|---|---|---|---|---|---|---|---|---|
| |||||||||||||||||||||||||||||||||||
Seafloor Cavern
The long-forgotten Seafloor Cavern can only be reached from an underwater cave in the depths of Route 128. Archie has gone to great lengths to breach the seal that has protected this place for ages, in the hope of awakening the super-ancient Pokémon rumored to dwell here. He believes this Pokémon has the power to bring about the great future he desires, but the risks seem far too great.
| Trainers | |||||||||||||||||||||||||||||||||||||||||||||||||||||||||||||||||||||||||||||||||||
|---|---|---|---|---|---|---|---|---|---|---|---|---|---|---|---|---|---|---|---|---|---|---|---|---|---|---|---|---|---|---|---|---|---|---|---|---|---|---|---|---|---|---|---|---|---|---|---|---|---|---|---|---|---|---|---|---|---|---|---|---|---|---|---|---|---|---|---|---|---|---|---|---|---|---|---|---|---|---|---|---|---|---|---|
| |||||||||||||||||||||||||||||||||||||||||||||||||||||||||||||||||||||||||||||||||||
| Available Pokémon | ||||||||||||||||||||||||||||||||||||||||||||||||||||||||||||||||||||||||||||||||||||||||||||||||||||||||||||||||||||||||||||||||||||||||||||||||||||||||||||||||||||||||||||||||||||||||||||||||||||||||||||||||||||||||||||||||||||||||
|---|---|---|---|---|---|---|---|---|---|---|---|---|---|---|---|---|---|---|---|---|---|---|---|---|---|---|---|---|---|---|---|---|---|---|---|---|---|---|---|---|---|---|---|---|---|---|---|---|---|---|---|---|---|---|---|---|---|---|---|---|---|---|---|---|---|---|---|---|---|---|---|---|---|---|---|---|---|---|---|---|---|---|---|---|---|---|---|---|---|---|---|---|---|---|---|---|---|---|---|---|---|---|---|---|---|---|---|---|---|---|---|---|---|---|---|---|---|---|---|---|---|---|---|---|---|---|---|---|---|---|---|---|---|---|---|---|---|---|---|---|---|---|---|---|---|---|---|---|---|---|---|---|---|---|---|---|---|---|---|---|---|---|---|---|---|---|---|---|---|---|---|---|---|---|---|---|---|---|---|---|---|---|---|---|---|---|---|---|---|---|---|---|---|---|---|---|---|---|---|---|---|---|---|---|---|---|---|---|---|---|---|---|---|---|---|---|---|---|---|---|---|---|---|---|---|---|---|---|---|---|---|---|
| ||||||||||||||||||||||||||||||||||||||||||||||||||||||||||||||||||||||||||||||||||||||||||||||||||||||||||||||||||||||||||||||||||||||||||||||||||||||||||||||||||||||||||||||||||||||||||||||||||||||||||||||||||||||||||||||||||||||||
| Items | ||||||||||||
|---|---|---|---|---|---|---|---|---|---|---|---|---|
| ||||||||||||
Entrance
When you first enter the cavern, you find Captain Stern's sub moored beneath the waves. Rise to the surface and take the north doorway to the next room.
Room 1
This room features two boulders that hinder travel. Go northwest and clear the way with Rock Smash, then use Strength to move the first boulder southward. Head east and move the second boulder eastward. At this point, there are two paths forward. The northwest doorway leads directly to the southeast part of Room 4. The southeast doorway leads through Rooms 2 and 3 to the southwest part of Room 4.
Room 2
Head south to a fork in the road. Both tunnels lead into the next room, but the western tunnel serves as a shortcut.
Room 3
The doorway to the south merely leads back to the entrance. Instead, go through the northeast doorway.
Room 4
Use Strength or Rock Smash to clear a path, then move the west-central boulder to the northwest corner. The northwest doorway leads to Room 5, while the northeast doorway leads to Room 6.
Room 5
This room has many strong water currents. Surf out into the water and ride the currents to a calm spot a short distance to the northeast. Sail east to ride the current to a patch of calm water to the northeast. Go east again to follow the current around the rock outcropping to the west side of the room. Surf westward and take the current to the northwest doorway.
Room 6
This room has many strong water currents. Surf eastward along the south wall to the second current, which leads a short distance northward. Go north from here to reach the west side of the room. Sail north once more to follow the current back and forth on the room's north side. Climb onto shore and go through the northwest doorway.
Room 7
The room splits into two tunnels before converging near the next doorway. The room's east side is littered with boulders, while the west side is clear, aside from Shelly and an Aqua Grunt. She's looking for payback for what happened in the Weather Institute, and draws you into battle!
VS Shelly
| ||||||||||||||||||||||||||||||||||||||||||||||||||||||||||||||||
Room 8
There are a dozen boulders here to block progress. Start off by moving the south-central boulder one step northward and the other two southern-most boulders farther apart. Push the first boulder one step westward, then shove the middle boulder one step northward. Move the boulders on the left and right farther apart, then push both the north-northwest and north-northeast boulders to the north wall. Finally, push the middle boulder to either side to reach the doorway.
Deepest Room
Go east to find TM26 (Earthquake) on the room's highest level before continuing along the downward-sloping corridor. Team Aqua's driven leader, Archie suddenly runs up to you. Like Maxie did with Groudon, Archie has discovered the super-ancient Pokémon, Kyogre, and stands ready to restore the creature with his stolen Red Orb. With his plan so close to fruition, he's not about to let anything stop him, and drags you into battle.
VS Archie
| |||||||||||||||||||||||||||||||||||||||||||||||||||||||||||||||||||||||||||||||||||||||||||
Even defeated, Archie reaffirms his intent to revive the super-ancient Pokémon. While talking, the Red Orb suddenly shines brightly, awakening Kyogre. Like Groudon before it, the Pokémon flees. Just then, Archie receives an urgent call from his subordinates outside. The great energy generated by the legendary creature has altered and intensified Hoenn's weather as expected, but to dangerous, unforeseen levels. The weather's dramatic shift to a strange mix of heavy rain and harsh sunlight influences any battles on the region's east side. Maxie and a pair of his Grunts enter a moment later. He condemns Team Aqua's actions and tries to reason with Archie, who counters by criticizing Team Magma for disturbing Groudon.
Route 128
The group returns to the surface, where they witness the extreme weather firsthand. Kyogre's power has surpassed expectations, forcing Archie to grudgingly agree to work with Maxie to set things right. Once the others leave, Steven swoops down to assess the situation. He informs you that the oppressive weather seems to originate in Sootopolis City to the northwest. He's headed there to investigate, and suggests you do the same.
|
Emerald walkthrough |
|

|
This article is part of Project Walkthroughs, a Bulbapedia project that aims to write comprehensive step-by-step guides on each Pokémon game. |
