Appendix:Gold and Silver walkthrough/Section 11: Difference between revisions
No edit summary |
mNo edit summary |
||
| Line 2: | Line 2: | ||
----- | ----- | ||
== Mahogany Town == | == Mahogany Town == | ||
[[File:Mahogany Town GSC.png|thumb|left|Mahogany Town]] | |||
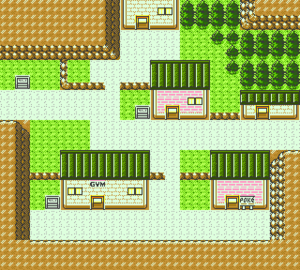
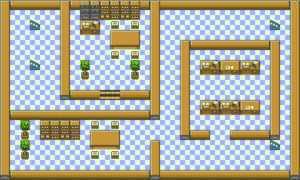
[[Mahogany Town]] is a small, quiet town in northern Johto. There is no official Poké Mart here, but the shop in the center of town offers the usual [[Poké Ball]]s and [[Potion]]s in addition to unusual items like {{DL|Valuable item|TinyMushroom}}s and {{DL|Valuable item|SlowpokeTail}}s. A man on the east side offers to sell you a [[RageCandyBar]] for {{pdollar}}300, though buying one doesn't let you leave the town. The [[Mahogany Gym]] is blocked off as well, so the only thing to do is head north. | |||
[[Mahogany Town]] is a small, quiet town in northern Johto | |||
== Route 43 == | == Route 43 == | ||
[[File:Johto Route 43 GSC.png|thumb|150px|right|Route 43]] | |||
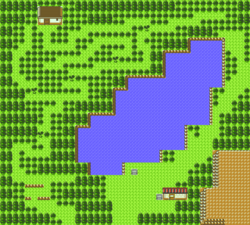
{{rt|43|Johto}} links Mahogany Town to a major landmark, the [[Lake of Rage]]. There are two paths that lead to the lake; the path through the gate forces you to pay a {{pdollar}}1,000 toll to [[Team Rocket]], while the other winds its way through the tall grass and past plenty of Trainers. | |||
{{rt|43|Johto}} | |||
There are two paths to | |||
{| class="expandable" align="center" style="background: #{{silver color light}}; {{roundy}}; border: 5px solid #{{gold color light}};" | {| class="expandable" align="center" style="background: #{{silver color light}}; {{roundy}}; border: 5px solid #{{gold color light}};" | ||
| Line 32: | Line 18: | ||
|- | |- | ||
| | | | ||
{{trainerheader}} | {{trainerheader|lake}} | ||
{{ | {{trainerentry|GSC Camper.png|Camper|Spencer|380|3|027|Sandshrew|♂|17|None|028|Sandslash|♂|17|None|041|Zubat|♂|19|None}} | ||
{{ | {{trainerdiv|lake}} | ||
{{ | {{trainerentry|GSC Picnicker.png|Picnicker|Tiffany|400|1|035|Clefairy|♀|20|None|38=phone}} | ||
{{ | {{trainerdiv|lake}} | ||
{{ | {{trainerentry|GSC Fisherman.png|Fisherman|Marvin|600|4|129|Magikarp|♂|10|None|130|Gyarados|♂|10|None|129|Magikarp|♂|15|None|130|Gyarados|♂|15|None}} | ||
{{ | {{trainerdiv|lake}} | ||
{{ | {{trainerentry|GSC PokeManiac.png|PokéManiac|Ron|1140|1|034|Nidoking|♂|19|None}} | ||
{{ | {{trainerdiv|lake}} | ||
{{ | {{trainerentry|GSC PokeManiac.png|PokéManiac|Brent|1140|1|108|Lickitung|♂|19|None|38=phone}} | ||
{{ | {{trainerdiv|lake}} | ||
{{ | {{trainerentry|GSC PokeManiac.png|PokéManiac|Ben|1140|1|080|Slowbro|♂|19|None}} | ||
{{ | {{trainerfooter|lake|II}} | ||
|} | |} | ||
{| class="expandable" align="center" style="background: #{{silver color light}}; {{roundy}}; border: 5px solid #{{gold color light}};" | {| class="expandable" align="center" style="background: #{{silver color light}}; {{roundy}}; border: 5px solid #{{gold color light}};" | ||
| Line 54: | Line 40: | ||
{{catch/entry2|203|Girafarig|yes|yes|no|Grass|15|all=30%|type1=Normal|type2=Psychic}} | {{catch/entry2|203|Girafarig|yes|yes|no|Grass|15|all=30%|type1=Normal|type2=Psychic}} | ||
{{catch/entry2|180|Flaaffy|yes|yes|no|Grass|15|30%|40%|30%|type1=Electric}} | {{catch/entry2|180|Flaaffy|yes|yes|no|Grass|15|30%|40%|30%|type1=Electric}} | ||
{{catch/entry2|017|Pidgeotto|yes|yes|no|Grass|17|25%|20%|0%|type1=Normal|type2=Flying}} | {{catch/entry2|017|Pidgeotto|yes|yes|no|Grass|17|25%|20%|0%|type1=Normal|type2=Flying}} | ||
{{catch/entry2|179|Mareep|yes|yes|no|Grass|15|10%|10%|5%|type1=Electric}} | {{catch/entry2|179|Mareep|yes|yes|no|Grass|15|10%|10%|5%|type1=Electric}} | ||
{{catch/entry2|048|Venonat|yes|yes|no|Grass|16|5%|0%|15%|type1=Bug|type2=Poison}} | {{catch/entry2|048|Venonat|yes|yes|no|Grass|16|5%|0%|15%|type1=Bug|type2=Poison}} | ||
{{catch/entry2|164|Noctowl|yes|yes|no|Grass|17|0%|0%|20%|type1=Normal|type2=Flying}} | {{catch/entry2|164|Noctowl|yes|yes|no|Grass|17|0%|0%|20%|type1=Normal|type2=Flying}} | ||
{{catch/entry2| | {{catch/div|lake|Surfing and Fishing}} | ||
{{catch/entry2| | {{catch/entry2|129|Magikarp|yes|yes|no|Surf|15-24|all=100%|type1=Water}} | ||
{{catch/entry2|060|Poliwag|yes|yes|no|Fish Old|10|all=15%|type1=Water}} | |||
{{catch/entry2|129|Magikarp|yes|yes|no|Fish Old|10|all=85%|type1=Water}} | |||
{{catch/entry2|060|Poliwag|yes|yes|no|Fish Good|20|all=65%|type1=Water}} | |||
{{catch/entry2|129|Magikarp|yes|yes|no|Fish Good|20|all=35%|type1=Water}} | |||
{{Catch/div|forest|Headbutt}} | |||
{{catch/entry2|021|Spearow|yes|yes|no|Headbutt|10|all=80%|type1=Normal|type2=Flying}} | {{catch/entry2|021|Spearow|yes|yes|no|Headbutt|10|all=80%|type1=Normal|type2=Flying}} | ||
{{catch/entry2|190|Aipom|yes|yes|no|Headbutt|10|all=20%|type1=Normal}} | {{catch/entry2|190|Aipom|yes|yes|no|Headbutt|10|all=20%|type1=Normal}} | ||
{{catch/entry2| | {{Catch/div|forest|Headbutt (Special Tree)}} | ||
{{catch/entry2| | {{catch/entry2|021|Spearow|yes|yes|no|Headbutt|10|all=50%|type1=Normal|type2=Flying}} | ||
{{catch/entry2| | {{catch/entry2|190|Aipom|yes|yes|no|Headbutt|10|all=20%|type1=Normal}} | ||
{{catch/entry2|214|Heracross|yes|yes|no|Headbutt|10|all=30%|type1=Bug|type2=Fighting}} | |||
{{catch/footer|land}} | {{catch/footer|land}} | ||
|} | |} | ||
| Line 85: | Line 65: | ||
| | | | ||
{{itlisth}} | {{itlisth}} | ||
{{itlistbod|none| | {{itlistbod|Max Ether|Above the two ledges west of the gate|GS|display={{DL|Ether|Max Ether}}}} | ||
{{itlistbod|TM Poison| | {{itlistbod|none|West of the larger pond (requires {{m|Surf}}, {{m|Cut}})|GS|display={{DL|Berries (Generation II)|Bitter Berry}}}} | ||
{{itlistbod|TM Poison|From the guard in the gate after Team Rocket has been defeated|GS|display={{TM|36|Sludge Bomb}}}} | |||
{{itlistfoot}} | {{itlistfoot}} | ||
|} | |} | ||
== Lake of Rage == | == Lake of Rage == | ||
[[File:Lake of Rage GSC.png|thumb|250px|left|Lake of Rage]] | |||
The [[Lake of Rage]] is the largest lake in the region, and exists alongside a maze of trees to the west. The area is known for its {{p|Gyarados}} population, and the most well-known resident is swimming just offshore. Check on your Poké Ball supply and swim out to meet the [[Red Gyarados]]. You should try to catch it, as the odds of finding another with the same [[Shiny Pokémon|coloration]] are very low. After you battle it, you see a {{DL|List of key items in Generation II|Red Scale}} floating on the water; you can trade this to Mr. Pokémon back on {{rt|30|Johto}} for an {{DL|Experience-affecting item|Exp. Share}}. | |||
Step back onto the shore and talk to the man reading the sign. This is [[Lance]]; he's been investigating rumors that all the {{p|Magikarp}} in the lake are being forced to evolve. He believes that an odd radio signal from {{to|Mahogany}} is the cause, so follow him back to the suspicious-looking shop. | |||
{| class="expandable" align="center" style="background: #{{silver color light}}; {{roundy}}; border: 5px solid #{{gold color light}};" | {| class="expandable" align="center" style="background: #{{silver color light}}; {{roundy}}; border: 5px solid #{{gold color light}};" | ||
| Line 109: | Line 84: | ||
|- | |- | ||
| | | | ||
{{catch/header| | {{catch/header|lake}} | ||
{{catch/entry2|129|Magikarp|yes|yes| | {{catch/entry2|129|Magikarp|yes|yes|no|Surf|5-25|all=90%|type1=Water}} | ||
{{catch/entry2|130|Gyarados|yes|yes| | {{catch/entry2|130|Gyarados|yes|yes|no|Surf|5-25|all=10%|type1=Water|type2=Flying}} | ||
{{catch/entry2|129|Magikarp|yes|yes| | {{catch/entry2|129|Magikarp|yes|yes|no|Fish Old|10|all=100%|type1=Water}} | ||
{{catch/entry2|129|Magikarp|yes|yes| | {{catch/entry2|129|Magikarp|yes|yes|no|Fish Good|20|all=90%|type1=Water}} | ||
{{catch/entry2|130|Gyarados|yes|yes| | {{catch/entry2|130|Gyarados|yes|yes|no|Fish Good|20|all=10%|type1=Water|type2=Flying}} | ||
{{catch/div|lake|Special}} | |||
{{catch/entry2|130s|Gyarados|yes|yes|no|Shiny|30|all=One|type1=Water|type2=Flying}} | |||
{{catch/div| | {{catch/footer|lake}} | ||
{{catch/entry2|130s|Gyarados|yes|yes| | |||
{{catch/footer| | |||
|} | |} | ||
{| class="expandable" align="center" style="background: #{{silver color light}}; {{roundy}}; border: 5px solid #{{gold color light}};" | {| class="expandable" align="center" style="background: #{{silver color light}}; {{roundy}}; border: 5px solid #{{gold color light}};" | ||
| Line 126: | Line 99: | ||
|- | |- | ||
| | | | ||
{{itlisth| | {{itlisth|lake}} | ||
{{itlistbod| | {{catch/div|lake|Lake side}} | ||
{{itlistbod| | {{itlistbod|Red Scale|Found after battling the [[Red Gyarados]]|GS|display={{DL|List of key items in Generation II|Red Scale}}}} | ||
{{itlistbod|Max Ether|| | {{itlistbod|Ether|From the Fishing Guru; show him a larger {{p|Magikarp}} than the one listed|GS}} | ||
{{itlistbod| | {{itlistbod|Max Potion|Northeast end of the lake (hidden)|GS|display={{DL|Potion|Max Potion}}}} | ||
{{ | {{catch/div|forest|Forest side}} | ||
{{itlistbod|Rare Candy| | {{itlistbod|Full Restore|Southwest of the lake (hidden)|GS|display={{DL|Potion|Full Restore}}}} | ||
{{itlistbod| | {{itlistbod|Max Ether|West of the lake|GS|display={{DL|Ether|Max Ether}}}} | ||
{{itlistbod| | {{itlistbod|Black Belt|Northwest corner, from [[Week Siblings|Wesley]]{{dotw|Wed}} on your first meeting|GS|display={{DL|Type-enhancing item|Black Belt}}}} | ||
{{itlistfoot| | {{itlistbod|Rare Candy|Northwest corner of the maze (hidden)|GS|display={{DL|Vitamin|Rare Candy}}}} | ||
{{itlistbod|TM Normal|From the man in the northwest house|GS|display={{TM|10|Hidden Power}}}} | |||
{{itlistbod|TM Fighting|Northeast corner of the maze|GS|display={{TM|43|Detect}}}} | |||
{{itlistfoot|lake}} | |||
|} | |} | ||
=== | {{-}} | ||
== Mahogany Town == | |||
Just as you enter the shop, you see [[Lance]]'s {{p|Dragonite}} using {{m|Hyper Beam}} to ensure cooperation from the shopkeeper. Lance confirms that the strange radio signal is coming from this location, and moves a cabinet to reveal a stairway leading down into the [[Team Rocket HQ]]. | |||
=== Rocket Hideout === | |||
{| class="expandable" align="center" style="background: #666666; {{roundy}}; border: 5px solid #CC0000;" | |||
== Rocket Hideout == | |- align="center" | ||
{| align=" | ! Team Rocket | ||
|- | |- | ||
| | |||
| | {| class="expandable" align="center" style="background: #666666; {{roundy}}; border: 5px solid #CC0000;" | ||
|- align="center" | |||
! B1F | |||
|- | |||
| | |||
{{trainerheader|road}} | |||
{{trainerentry|GSC Rocket GruntM.png|Rocket Grunt||640|4|019|Rattata|♂|16|None|019|Rattata|♂|16|None|019|Rattata|♂|16|None|019|Rattata|♂|16|None}} | |||
{{trainerdiv|road}} | |||
{{trainerentry|GSC Scientist.png|Scientist|Jed|2000|3|081|Magnemite|♂|20|None|081|Magnemite|♂|20|None|081|Magnemite|♂|20|None}} | |||
{{trainerfooter|road|II}} | |||
|} | |} | ||
{| class="expandable" align="center" style="background: #666666; {{ | {| class="expandable" align="center" style="background: #666666; {{roundy}}; border: 5px solid #CC0000;" | ||
|- align="center" | |- align="center" | ||
! | ! B2F | ||
|- | |- | ||
| | | | ||
{{ | {{trainerheader|road}} | ||
{{ | {{trainerentry|GSC Rocket GruntM.png|Rocket Grunt||720|2|048|Venonat|♂|18|None|048|Venonat|♂|18|None}} | ||
{{trainerdiv|road}} | |||
{{ | {{trainerentry|GSC Rocket GruntM.png|Rocket Grunt||720|1|042|Golbat|♂|18|None}} | ||
{{ | {{trainerdiv|road}} | ||
{{trainerentry|GSC Rocket GruntM.png|Rocket Grunt||680|3|019|Rattata|♂|17|None|041|Zubat|♂|17|None|019|Rattata|♂|17|None}} | |||
{{ | {{trainerfooter|road|II}} | ||
{{ | |||
{{ | |||
|} | |} | ||
{| class="expandable" align="center" style="background: #666666; {{roundy}}; border: 5px solid #CC0000;" | |||
{| class="expandable" align="center" style="background: #666666; {{ | |||
|- align="center" | |- align="center" | ||
! | ! B3F | ||
|- | |- | ||
| | | | ||
{{trainerheader}} | {{trainerheader|road}} | ||
{{ | {{trainerentry|GSC Rocket GruntF.png|Rocket Grunt||720|2|023|Ekans|♂|18|None|044|Gloom|♂|18|None}} | ||
{{ | {{trainerdiv|road}} | ||
{{ | {{trainerentry|GSC Rocket GruntM.png|Rocket Grunt||760|1|020|Raticate|♂|19|None}} | ||
{{ | {{trainerdiv|road}} | ||
{{trainerentry|GSC Scientist.png|Scientist|Ross|2200|2|109|Koffing|♂|22|None|109|Koffing|♂|22|None|}} | |||
{{trainerdiv|road}} | |||
{{trainerentry|GSC Scientist.png|Scientist|Mitch|2400|1|132|Ditto||24|None}} | |||
{{trainerfooter|road|II}} | |||
|} | |||
|} | |} | ||
{| class="expandable" align="center" style="background: #666666; {{roundy}}; border: 5px solid #CC0000;" | |||
{| class="expandable" align="center" style="background: #666666; {{ | |||
|- align="center" | |- align="center" | ||
! | ! Items | ||
|- | |- | ||
| | | | ||
{{ | {{itlisth|road}} | ||
{{ | {{catch/div|road|B1F}} | ||
{{ | {{itlistbod|X Accuracy|Behind Scientist Jed in the security center|GS|display={{DL|Battle item|X Accuracy}}}} | ||
{{ | {{itlistbod|Hyper Potion|Northeast of the security center|GS|display={{DL|Potion|Hyper Potion}}}} | ||
{{ | {{itlistbod|Nugget|In the south hallway|GS|display={{DL|Valuable item|Nugget}}}} | ||
{{catch/div|road|B2F}} | |||
{{itlistbod|TM Dark|In the western room, accessed from B3F|GS|display={{TM|46|Thief}}}} | |||
{{itlistbod|HM Water|From Lance after disabling the generator|GS|display={{HM|06|Whirlpool}}}} | |||
{{catch/div|road|B3F}} | |||
{{itlistbod|Protein|In the east hallway|GS|display={{DL|Vitamin|Protein}}}} | |||
{{itlistbod|Dire Hit|In the southwest room|GS|display={{DL|Battle item|Dire Hit}}}} | |||
{{itlistbod|Full Heal|In the southwest room|GS|display={{DL|Status ailment healing item|Full Heal}}}} | |||
{{itlistbod|Ice Heal|To the left of the northeast stairs|GS|display={{DL|Status ailment healing item|Ice Heal}}}} | |||
{{itlistfoot|road}} | |||
|} | |} | ||
[[File:Rocket Hideout B1F GSC.png|thumb|right|Rocket Hideout, B1F]] | |||
==== B1F ==== | |||
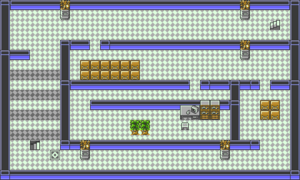
Each of the five Pokémon statues on this floor has a hidden camera that alerts the Rocket Grunts in the security center. Whenever you step in front of one, the same two Rockets show up to attack you. | |||
| | |||
{| class="expandable" align="center" style="background: #666666; {{roundytop|10px}} {{roundybottom|10px}}; border: 5px solid #CC0000;" | {| class="expandable" align="center" style="background: #666666; {{roundytop|10px}} {{roundybottom|10px}}; border: 5px solid #CC0000;" | ||
|- align="center" | |- align="center" | ||
! | ! Rocket Security | ||
|- | |- | ||
| | | | ||
{{trainerheader}} | {{trainerheader|road}} | ||
{{ | {{trainerentry|GSC Rocket GruntM.png|Rocket Grunt||760|2|096|Drowzee|♂|17|None|041|Zubat|♂|19|None}} | ||
{{ | {{trainerdiv|road}} | ||
{{ | {{trainerentry|GSC Rocket GruntM.png|Rocket Grunt||720|3|041|Zubat|♂|16|None|088|Grimer|♂|17|None|019|Rattata|♂|18|None}} | ||
{{ | {{trainerfooter|road|II}} | ||
|} | |} | ||
Take the first left and head south to the security center. Defeat Scientist Jed, grab the {{DL|Battle item|X Accuracy}}, and examine the computer to deactivate the security cameras. Leave the room and turn east to find a {{DL|Potion|Hyper Potion}}. Turn right and walk along the south hallway, where you'll find a {{DL|Valuable item|Nugget}}. Go down the stairs in the southwest. | |||
==== B2F ==== | |||
[[File:Rocket Hideout B2F GSC.png|thumb|right|Rocket Hideout, B2F]] | |||
Lance is waiting for you here, and heals your Pokémon before running off. Beat up the two Rocket Grunts nearby, and take the southeast stairs to the lowest floor. | |||
===B3F=== | ==== B3F ==== | ||
[[File:Rocket Hideout B3F GSC.png|thumb|right|Rocket Hideout, B3F]] | |||
| | |||
{| | Here Lance informs you that two passwords are required to reach the boss. Grab the {{DL|Vitamin|Protein}} just north of here, then battle the scientist and the female Rocket in the southeast room. When defeated, she gives up the first password: <sc>{{DL|Valuable item|SlowpokeTail}}</sc>. One down, one to go! Continue west, fight Scientist Mitch, and enter the southwest room. Defeat the Rocket here to learn the second password, <sc>{{p|Raticate|RaticateTail}}</sc>. Pick up the {{DL|Battle item|Dire Hit}} and the {{DL|Status ailment healing item|Full Heal}} by the potted plants, then head north. Grab the {{DL|Status ailment healing item|Ice Heal}} in the hallway, and climb up the northeast stairs. | ||
! | |||
{{ | |||
{{ | |||
{{ | |||
{{ | |||
===B2F=== | ==== B2F ==== | ||
Head all the way to the west, where you'll be challenged by another Rocket. Go down the stairs to reach the boss's room. | |||
==== B3F ==== | |||
When you approach, {{ga|Silver|your rival}} appears and insists that he is the one who will eliminate [[Team Rocket]]. Take a quick detour up the south stairs to get {{TM|46|Thief}}, then enter the two passwords at his door to enter the boss's office. The Executive here talks about [[Giovanni]] disbanding the group [[Generation I|three years ago]], and how the organization has continued on since then, planning for his return. | |||
{| | {| align="center" | ||
| | | | ||
{{Party|color=666666|bordercolor=CC0000|headcolor=CCCCCC | |||
| | |sprite=GSC Rocket ExecutiveM.png | ||
|prize={{PDollar}}1584 | |||
{{ | |class=Rocket | ||
|name=Executive | |||
{{ | |game=GSC | ||
|location=Team Rocket HQ | |||
|locationname=Rocket Hideout | |||
|pokemon=3 | |||
|pokemon1={{Pokémon|gen=2|game=Crystal|ndex=041|pokemon=Zubat | |||
|gender=male|level=22|type1=Poison|type2=Flying | |||
|move1=Leech Life|move1type=Bug | |||
|move2=Bite|move2type=Dark | |||
|move3=Supersonic|move3type=Normal | |||
|move4=Confuse Ray|move4type=Ghost}} | |||
|pokemon2={{Pokémon|gen=2|game=Crystal|ndex=109|pokemon=Koffing | |||
|gender=male|level=22|type1=Poison | |||
|move1=Smog|move1type=Poison | |||
|move2=Tackle|move2type=Normal | |||
|move3=Sludge|move3type=Poison | |||
|move4=Selfdestruct|move4type=Normal}} | |||
|pokemon3={{Pokémon|gen=2|game=Crystal|ndex=020|pokemon=Raticate | |||
|gender=male|level=24|type1=Normal | |||
|move1=Hyper Fang|move1type=Normal | |||
|move2=Quick Attack|move2type=Normal | |||
|move3=Scary Face|move3type=Normal | |||
|move4=Tail Whip|move4type=Normal}} | |||
}} | |||
|} | |} | ||
{| | Defeated, he runs off to warn the others that their plans are in trouble. Talk to the {{p|Murkrow}} in the corner to learn the password for the generator room, <sc>Hail Giovanni</sc>. | ||
| | |||
==== B2F ==== | |||
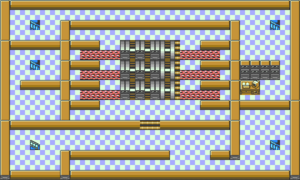
| | Backtrack to the generator room on the second floor. After entering the password, an Executive and a Grunt ambush you and prepare for a 2-on-1 battle, but their plan is short-lived. [[Lance]] shows up with his {{p|Dragonite}}, and the two of you each battle a single Rocket. | ||
| | |||
{{ | {| align="center" | ||
| | |||
{{ | {{Party|color=666666|bordercolor=CC0000|headcolor=CCCCCC | ||
|sprite=GSC Rocket ExecutiveF.png | |||
|prize={{pdollar}}1800 | |||
|class=Rocket | |||
|name=Executive | |||
|game=GSC | |||
|location=Team Rocket HQ | |||
|locationname=Rocket Hideout | |||
|pokemon=3 | |||
|pokemon1={{Pokémon/2|game=Crystal|ndex=024|pokemon=Arbok | |||
|gender=female|level=23|type1=Poison | |||
|move1=Leer|move1type=Normal | |||
|move2=Bite|move2type=Dark | |||
|move3=Wrap|move3type=Normal | |||
|move4=Poison Sting|move4type=Poison}} | |||
|pokemon2={{Pokémon/2|game=Crystal|ndex=044|pokemon=Gloom | |||
|gender=female|level=23|type1=Grass|type2=Poison | |||
|move1=Sweet Scent|move1type=Normal | |||
|move2=Absorb|move2type=Grass | |||
|move3=Acid|move3type=Poison | |||
|move4=Sleep Powder|move4type=Grass}} | |||
|pokemon3={{Pokémon/2|game=Crystal|ndex=198|pokemon=Murkrow | |||
|gender=female|level=25|type1=Dark|type2=Flying | |||
|move1=Peck|move1type=Flying | |||
|move2=Haze|move2type=Ice | |||
|move3=Pursuit|move3type=Dark}} | |||
}} | |||
|} | |} | ||
They claim their experiment was a success, regardless of their defeat here. Lance inspects the generator, and tells you that in order to shut it down, the six {{p|Electrode}} powering it must be removed. Catch or defeat the three on the left to put an end to [[Team Rocket]]'s plan. With the machine disabled, Lance rewards you with {{HM|06|Whirlpool}}. Follow him upstairs and take the warp tile back to the entrance. | |||
With Mahogany free of Rockets, you can finally challenge the Gym. | |||
=== Mahogany Gym === | |||
[[File:Mahogany Gym GSC.png|thumb|right|Mahogany Gym]] | |||
| | |||
{{sign|RBY|header}} | {{sign|RBY|header}} | ||
| Line 291: | Line 302: | ||
{{sign|RBY|footer}} | {{sign|RBY|footer}} | ||
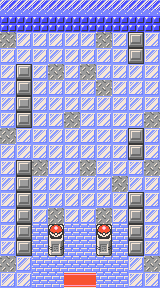
[[ | The [[Mahogany Gym]] specializes in {{type|Ice}} Pokémon, and [[Pryce]] has installed frozen tiles to thwart all but the most determined Trainers. The most direct route to the Gym Leader can be made in six moves. Stand by the Poké Ball statue on the left, and slide up twice to the first Boarder. Slide right, down, left, up, and right again to meet Pryce. {{t|Fire}}-, {{t|Fighting}}-, {{t|Rock}}-, and {{type|Steel}} attacks are the most effective against Ice-types, but {{type|Electric}} attacks are also effective against the {{p|Seel}} and {{p|Shellder}} families. Avoid bringing {{t|Grass}}-, {{t|Flying}}-, and {{type|Ground}} Pokémon unless you want a challenge. | ||
{| align="center" | {| align="center" | ||
|- align="center" valign="top" | |- align="center" valign="top" | ||
| | | | ||
{| align="center" style="background: #{{ice color}}; {{ | {| align="center" style="background: #{{ice color}}; {{roundy}}; border: 5px solid #{{ice color light}};" | ||
|- align="center" | |- align="center" | ||
! Mahogany Gym <br> [[File:Glacier Badge.png|35px|The Glacier Badge]] <br><br> | ! Mahogany Gym <br> [[File:Glacier Badge.png|35px|The Glacier Badge]] <br><br> | ||
|- | |- | ||
| | | | ||
{| align="center" class="expandable" style="background: #{{ice color}}; {{ | {| align="center" class="expandable" style="background: #{{ice color}}; {{roundy}}; border: 5px solid #{{ice color light}};" | ||
|- align="center" | |- align="center" | ||
! Trainers | ! Trainers | ||
|- | |- | ||
| | | | ||
{{ | {{trainerheader|Ice}} | ||
{{ | {{trainerentry|GSC Skier.png|Skier|Roxanne|2016|1|124|Jynx|♀|28|None}} | ||
{{ | {{trainerdiv|Ice}} | ||
{{ | {{trainerentry|GSC Boarder.png|Boarder|Ronald|1728|3|086|Seel|♂|24|None|086|Seel|♂|24|None|087|Dewgong|♂|25|None}} | ||
{{ | {{trainerdiv|Ice}} | ||
{{ | {{trainerentry|GSC Skier.png|Skier|Clarissa|2016|1|087|Dewgong|♀|28|None}} | ||
{{ | {{trainerdiv|Ice}} | ||
{{ | {{trainerentry|GSC Boarder.png|Boarder|Brad|1872|2|220|Swinub|♂|26|None|220|Swinub|♂|26|None}} | ||
{{ | {{trainerdiv|Ice}} | ||
{{ | {{trainerentry|GSC Boarder.png|Boarder|Douglas|1728|3|090|Shellder|♂|24|None|090|Shellder|♂|24|None|091|Cloyster|♂|25|None}} | ||
{{ | {{trainerfooter|Ice|2|inside}} | ||
|} | |} | ||
| Line 357: | Line 368: | ||
|} | |} | ||
[[Pryce]] rewards your victory with the {{badge|Glacier}}, which increases your Pokémon's {{stat|Special Attack}} and {{stat|Special Defense}}, and enables the use of {{m|Whirlpool}} outside of battle. He also gives you {{TM|16|Icy Wind}}, a symbol of winter's harshness. Seven badges down, one to go! | |||
When you | |||
When you leave the Gym, {{prof|Elm}} calls you about strange radio broadcasts that mention Team Rocket. It seems that the gang has one more trick up their sleeve, so fly back to [[Goldenrod City]] to finally put an end to their plans. | |||
{{WalkthroughPrevNext | |||
|game=Gold | |||
|game2=Silver | |||
|gamename=Gold and Silver | |||
|prev=yes | |||
|next=yes | |||
|prevsection=10 | |||
|nextsection=12 | |||
|prevname=Cianwood City, Olivine Gym, Route 42 | |||
|nextname=Radio Tower, Goldenrod Underground, Route 44, Ice Path | |||
}} | |||
<br> | <br> | ||
{{Project Walkthroughs notice}} | {{Project Walkthroughs notice}} | ||
[[Category:Gold and Silver walkthrough]] | [[Category:Gold and Silver walkthrough]] | ||
Revision as of 19:20, 16 August 2012
The guide for those can be found here.
Mahogany Town
Mahogany Town is a small, quiet town in northern Johto. There is no official Poké Mart here, but the shop in the center of town offers the usual Poké Balls and Potions in addition to unusual items like TinyMushrooms and SlowpokeTails. A man on the east side offers to sell you a RageCandyBar for $300, though buying one doesn't let you leave the town. The Mahogany Gym is blocked off as well, so the only thing to do is head north.
Route 43
Route 43 links Mahogany Town to a major landmark, the Lake of Rage. There are two paths that lead to the lake; the path through the gate forces you to pay a $1,000 toll to Team Rocket, while the other winds its way through the tall grass and past plenty of Trainers.
| Trainers | ||||||||||||||||||||||||||||||||||||||||||||||||||||||||||||||||||||||||||||||||||||||||||||||||||||||||||||||||||||||||||
|---|---|---|---|---|---|---|---|---|---|---|---|---|---|---|---|---|---|---|---|---|---|---|---|---|---|---|---|---|---|---|---|---|---|---|---|---|---|---|---|---|---|---|---|---|---|---|---|---|---|---|---|---|---|---|---|---|---|---|---|---|---|---|---|---|---|---|---|---|---|---|---|---|---|---|---|---|---|---|---|---|---|---|---|---|---|---|---|---|---|---|---|---|---|---|---|---|---|---|---|---|---|---|---|---|---|---|---|---|---|---|---|---|---|---|---|---|---|---|---|---|---|---|
| ||||||||||||||||||||||||||||||||||||||||||||||||||||||||||||||||||||||||||||||||||||||||||||||||||||||||||||||||||||||||||
| Available Pokémon | ||||||||||||||||||||||||||||||||||||||||||||||||||||||||||||||||||||||||||||||||||||||||||||||||||||||||||||||||||||||||||||||||||||||||||||||||||||||||||||||||||||||||||||||||||||||||||||||||||||||||||||||||||||||||||||||||||||||||||||||||||||||||||||||||||||||||||||||||||||||||||||||||||||||||||||||||||||||||||||||||||||||||||
|---|---|---|---|---|---|---|---|---|---|---|---|---|---|---|---|---|---|---|---|---|---|---|---|---|---|---|---|---|---|---|---|---|---|---|---|---|---|---|---|---|---|---|---|---|---|---|---|---|---|---|---|---|---|---|---|---|---|---|---|---|---|---|---|---|---|---|---|---|---|---|---|---|---|---|---|---|---|---|---|---|---|---|---|---|---|---|---|---|---|---|---|---|---|---|---|---|---|---|---|---|---|---|---|---|---|---|---|---|---|---|---|---|---|---|---|---|---|---|---|---|---|---|---|---|---|---|---|---|---|---|---|---|---|---|---|---|---|---|---|---|---|---|---|---|---|---|---|---|---|---|---|---|---|---|---|---|---|---|---|---|---|---|---|---|---|---|---|---|---|---|---|---|---|---|---|---|---|---|---|---|---|---|---|---|---|---|---|---|---|---|---|---|---|---|---|---|---|---|---|---|---|---|---|---|---|---|---|---|---|---|---|---|---|---|---|---|---|---|---|---|---|---|---|---|---|---|---|---|---|---|---|---|---|---|---|---|---|---|---|---|---|---|---|---|---|---|---|---|---|---|---|---|---|---|---|---|---|---|---|---|---|---|---|---|---|---|---|---|---|---|---|---|---|---|---|---|---|---|---|---|---|---|---|---|---|---|---|---|---|---|---|---|---|---|---|---|---|---|---|---|---|---|---|---|---|---|---|---|---|---|---|---|---|---|---|---|---|---|---|---|---|---|---|---|---|---|---|---|---|---|
| ||||||||||||||||||||||||||||||||||||||||||||||||||||||||||||||||||||||||||||||||||||||||||||||||||||||||||||||||||||||||||||||||||||||||||||||||||||||||||||||||||||||||||||||||||||||||||||||||||||||||||||||||||||||||||||||||||||||||||||||||||||||||||||||||||||||||||||||||||||||||||||||||||||||||||||||||||||||||||||||||||||||||||
| Items | ||||||||
|---|---|---|---|---|---|---|---|---|
| ||||||||
Lake of Rage
The Lake of Rage is the largest lake in the region, and exists alongside a maze of trees to the west. The area is known for its Gyarados population, and the most well-known resident is swimming just offshore. Check on your Poké Ball supply and swim out to meet the Red Gyarados. You should try to catch it, as the odds of finding another with the same coloration are very low. After you battle it, you see a Red Scale floating on the water; you can trade this to Mr. Pokémon back on Route 30 for an Exp. Share.
Step back onto the shore and talk to the man reading the sign. This is Lance; he's been investigating rumors that all the Magikarp in the lake are being forced to evolve. He believes that an odd radio signal from Mahogany is the cause, so follow him back to the suspicious-looking shop.
| Available Pokémon | ||||||||||||||||||||||||||||||||||||||||||||||||||||||||||||||||||||||||||||||||||||||||||||||||||||||||||||||||||||||||||||||||||||||||||||
|---|---|---|---|---|---|---|---|---|---|---|---|---|---|---|---|---|---|---|---|---|---|---|---|---|---|---|---|---|---|---|---|---|---|---|---|---|---|---|---|---|---|---|---|---|---|---|---|---|---|---|---|---|---|---|---|---|---|---|---|---|---|---|---|---|---|---|---|---|---|---|---|---|---|---|---|---|---|---|---|---|---|---|---|---|---|---|---|---|---|---|---|---|---|---|---|---|---|---|---|---|---|---|---|---|---|---|---|---|---|---|---|---|---|---|---|---|---|---|---|---|---|---|---|---|---|---|---|---|---|---|---|---|---|---|---|---|---|---|---|---|
| ||||||||||||||||||||||||||||||||||||||||||||||||||||||||||||||||||||||||||||||||||||||||||||||||||||||||||||||||||||||||||||||||||||||||||||
| Items | ||||||||||||||||||||||||||||||||||||||
|---|---|---|---|---|---|---|---|---|---|---|---|---|---|---|---|---|---|---|---|---|---|---|---|---|---|---|---|---|---|---|---|---|---|---|---|---|---|---|
| ||||||||||||||||||||||||||||||||||||||
Mahogany Town
Just as you enter the shop, you see Lance's Dragonite using Hyper Beam to ensure cooperation from the shopkeeper. Lance confirms that the strange radio signal is coming from this location, and moves a cabinet to reveal a stairway leading down into the Team Rocket HQ.
Rocket Hideout
| Team Rocket | |||||||||||||||||||||||||||||||||||||||||||||||||||||||||||||||||||||||||||||||||||||||||||||||||||||||||||||||||||||||||||||||||||||||||||||||||||||||||||||||||||||||||||||||||||||||||||||||||||||||||||||||
|---|---|---|---|---|---|---|---|---|---|---|---|---|---|---|---|---|---|---|---|---|---|---|---|---|---|---|---|---|---|---|---|---|---|---|---|---|---|---|---|---|---|---|---|---|---|---|---|---|---|---|---|---|---|---|---|---|---|---|---|---|---|---|---|---|---|---|---|---|---|---|---|---|---|---|---|---|---|---|---|---|---|---|---|---|---|---|---|---|---|---|---|---|---|---|---|---|---|---|---|---|---|---|---|---|---|---|---|---|---|---|---|---|---|---|---|---|---|---|---|---|---|---|---|---|---|---|---|---|---|---|---|---|---|---|---|---|---|---|---|---|---|---|---|---|---|---|---|---|---|---|---|---|---|---|---|---|---|---|---|---|---|---|---|---|---|---|---|---|---|---|---|---|---|---|---|---|---|---|---|---|---|---|---|---|---|---|---|---|---|---|---|---|---|---|---|---|---|---|---|---|---|---|---|---|---|---|---|
| |||||||||||||||||||||||||||||||||||||||||||||||||||||||||||||||||||||||||||||||||||||||||||||||||||||||||||||||||||||||||||||||||||||||||||||||||||||||||||||||||||||||||||||||||||||||||||||||||||||||||||||||
| Items | |||||||||||||||||||||||||||||||||||||||||||||||||||||
|---|---|---|---|---|---|---|---|---|---|---|---|---|---|---|---|---|---|---|---|---|---|---|---|---|---|---|---|---|---|---|---|---|---|---|---|---|---|---|---|---|---|---|---|---|---|---|---|---|---|---|---|---|---|
| |||||||||||||||||||||||||||||||||||||||||||||||||||||
B1F
Each of the five Pokémon statues on this floor has a hidden camera that alerts the Rocket Grunts in the security center. Whenever you step in front of one, the same two Rockets show up to attack you.
| Rocket Security | ||||||||||||||||||||||||||||||||||||||||||||||||||
|---|---|---|---|---|---|---|---|---|---|---|---|---|---|---|---|---|---|---|---|---|---|---|---|---|---|---|---|---|---|---|---|---|---|---|---|---|---|---|---|---|---|---|---|---|---|---|---|---|---|---|
| ||||||||||||||||||||||||||||||||||||||||||||||||||
Take the first left and head south to the security center. Defeat Scientist Jed, grab the X Accuracy, and examine the computer to deactivate the security cameras. Leave the room and turn east to find a Hyper Potion. Turn right and walk along the south hallway, where you'll find a Nugget. Go down the stairs in the southwest.
B2F
Lance is waiting for you here, and heals your Pokémon before running off. Beat up the two Rocket Grunts nearby, and take the southeast stairs to the lowest floor.
B3F
Here Lance informs you that two passwords are required to reach the boss. Grab the Protein just north of here, then battle the scientist and the female Rocket in the southeast room. When defeated, she gives up the first password: SlowpokeTail. One down, one to go! Continue west, fight Scientist Mitch, and enter the southwest room. Defeat the Rocket here to learn the second password, RaticateTail. Pick up the Dire Hit and the Full Heal by the potted plants, then head north. Grab the Ice Heal in the hallway, and climb up the northeast stairs.
B2F
Head all the way to the west, where you'll be challenged by another Rocket. Go down the stairs to reach the boss's room.
B3F
When you approach, your rival appears and insists that he is the one who will eliminate Team Rocket. Take a quick detour up the south stairs to get TM46 (Thief), then enter the two passwords at his door to enter the boss's office. The Executive here talks about Giovanni disbanding the group three years ago, and how the organization has continued on since then, planning for his return.
| ||||||||||||||||||||||||||||||||||||||||||||||||||||||||||||||||||||||||||||||||||||||||
Defeated, he runs off to warn the others that their plans are in trouble. Talk to the Murkrow in the corner to learn the password for the generator room, Hail Giovanni.
B2F
Backtrack to the generator room on the second floor. After entering the password, an Executive and a Grunt ambush you and prepare for a 2-on-1 battle, but their plan is short-lived. Lance shows up with his Dragonite, and the two of you each battle a single Rocket.
| |||||||||||||||||||||||||||||||||||||||||||||||||||||||||||||||||||||||||||||||||||||||||
They claim their experiment was a success, regardless of their defeat here. Lance inspects the generator, and tells you that in order to shut it down, the six Electrode powering it must be removed. Catch or defeat the three on the left to put an end to Team Rocket's plan. With the machine disabled, Lance rewards you with HM06 (Whirlpool). Follow him upstairs and take the warp tile back to the entrance.
With Mahogany free of Rockets, you can finally challenge the Gym.
Mahogany Gym
MAHOGANY TOWN
POKéMON GYM
LEADER: PRYCE
The Teacher of
Winter's Harshness
The Mahogany Gym specializes in Ice-type Pokémon, and Pryce has installed frozen tiles to thwart all but the most determined Trainers. The most direct route to the Gym Leader can be made in six moves. Stand by the Poké Ball statue on the left, and slide up twice to the first Boarder. Slide right, down, left, up, and right again to meet Pryce. Fire-, Fighting-, Rock-, and Steel-type attacks are the most effective against Ice-types, but Electric-type attacks are also effective against the Seel and Shellder families. Avoid bringing Grass-, Flying-, and Ground-type Pokémon unless you want a challenge.
| ||||||||||||||||||||||||||||||||||||||||||||||||||||||||||||||||||||||||||||||||||||||||||||||||||||||||||||||||||||||||||||||||||||||||||||||||||||||||||||||||||||||||||||||||||||||||||||||||||||||||
Pryce rewards your victory with the Glacier Badge, which increases your Pokémon's Special Attack and Special Defense, and enables the use of Whirlpool outside of battle. He also gives you TM16 (Icy Wind), a symbol of winter's harshness. Seven badges down, one to go!
When you leave the Gym, Elm calls you about strange radio broadcasts that mention Team Rocket. It seems that the gang has one more trick up their sleeve, so fly back to Goldenrod City to finally put an end to their plans.
|
Gold and Silver walkthrough |
|

|
This article is part of Project Walkthroughs, a Bulbapedia project that aims to write comprehensive step-by-step guides on each Pokémon game. |
